Blending depends on order: a transparent surface is mixed with whatever is already on screen, so what is behind has to be drawn first. three.js sorts whole objects, not triangles or pixels, once per frame. And depth writes and blending order solve different problems — mixing them up causes most of the bugs below. The table maps each symptom to its fix; the sections after it show both with screenshots and measured cost.
Find your case
Match what you see to the cause, then follow the link to screenshots of the problem, the fix and what the fix costs. Everything here is plain WebGLRenderer in three.js r180; the rules apply unchanged to React Three Fiber, which uses the same renderer.
Scroll the table sideways for all columns →
| What you see | Cause | Fix |
|---|---|---|
| An object behind glass disappears; only its opaque parts remain | The glass was drawn first and wrote depth | depth on the glass, or draw the object first with render |
| A transparent object looks in front of glass it is behind, untinted | The sort used the wrong centre | render, or split the large mesh |
| The order flips as the camera moves | Two bounding-sphere centres swap depth | Split large meshes; fix the pair with render |
| Two crossing transparent planes: half looks wrong from every angle | No order of the two objects is correct | Split along the intersection, alpha or OIT |
| Rectangles or sky-coloured holes inside smoke, sprites or leaves | Blended cards with depth on | Particles: depth + sort; leaves: alpha |
| Inner parts of one mesh draw over outer parts | Triangles inside a mesh are never sorted | Keep double-sided two-pass, sort indices, or OIT |
Transparency looks different after adding Effect | Often: blending moved from sRGB to linear | Check tone mapping, exposure and Output first; then retune opacity |
| A marker or gizmo must stay visible through walls | render only orders within one list | transparent + depth, or an overlay pass |
| Leaves look right but have jagged edges; MSAA does not help | alpha test is binary per pixel | alpha with MSAA |
| A tree casts square shadows | The shadow pass ignores blending and alpha | alpha on the leaf material, or an alpha depth material |
| Glass looks milky and its reflections are weak | opacity fades reflections too | Mesh with transmission |
| Things behind transmission glass vanish: particles, blended leaves, other glass | The transmission pass renders only opaque objects | Cut-out leaves; keep blended effects out from behind glass |
How three.js orders a frame
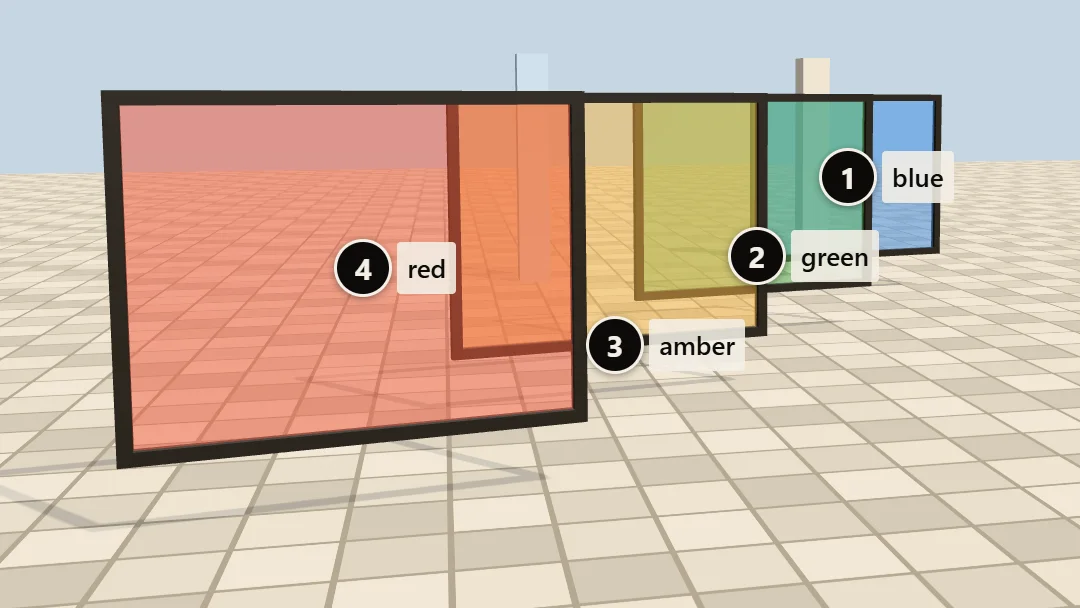
onBeforeRender during the frame.Three settings decide what happens to every fragment of a transparent surface:
depthTest— may this fragment be drawn at all, or is something already closer?depthWrite— should its depth be remembered, so that later fragments behind it are rejected?- Blending — how its colour is mixed with the colour already in the framebuffer.
Blending is order-dependent. Take two layers, pure red and pure blue, both at opacity 0.8, over a black background (linear values, before the output conversion). Blue first, then red: (0.8, 0, 0.16), mostly red. Red first, then blue: (0.16, 0, 0.8), mostly blue. Same two layers, same pixel, different result — so the renderer has to draw transparent surfaces from back to front, the painter’s order.
WebGLRenderer.render() walks the scene once and puts every visible mesh into one of three lists, decided by its material: transmission > 0 goes into the transmissive list, transparent: true into the transparent list, everything else into the opaque list. Then it draws the lists in that order: opaque, transmissive, transparent.
The opaque and transparent lists are sorted in opposite directions (the transmissive list is sorted like the transparent one). Opaque meshes go roughly front to back, grouped by material first, so the depth test can reject hidden pixels before they are shaded. Transparent meshes go back to front. The key is each object’s depth relative to the camera after projection (clip-space z), not its plain distance from the camera. The comparator, from WebGLRenderLists.js:
// three.js r180, src/renderers/webgl/WebGLRenderLists.js
function reversePainterSortStable( a, b ) {
  if ( a.groupOrder !== b.groupOrder ) return a.groupOrder - b.groupOrder;
  if ( a.renderOrder !== b.renderOrder ) return a.renderOrder - b.renderOrder;
  if ( a.z !== b.z ) return b.z - a.z;   // farther first
  return a.id - b.id;
}

// WebGLRenderer.projectObject(): z is ONE point per object
_vector4.copy( geometry.boundingSphere.center )
  .applyMatrix4( object.matrixWorld )
  .applyMatrix4( _projScreenMatrix );   // z = depth of the bounding-sphere centre
Five consequences explain most forum threads:
opacityalone does nothing. Withtransparent: falsethe mesh stays in the opaque list and three.js compiles the shader withOPAQUE, which forces alpha to 1. Settransparent: truewhen you create the material, or use one of the cut-out modes below. On a material that has already been rendered, also setmaterial.needsUpdate = true(see the FAQ).- One depth per object, taken at the centre of
geometry.boundingSphere. AnInstancedMeshhas a single bounding sphere for all its instances, so they are sorted as one object and drawn in instance order.BatchedMeshis the exception: withsortObjectson (the default) it sorts its own instances back to front when the material is transparent. - No sorting inside a mesh. Triangles are drawn in index order. A merged mesh, a
Pointscloud or a voxel chunk is one item in the list, whatever it contains. renderOrderbeats depth, and aTHREE.Group’srenderOrderis compared even before it: every descendant gets it asgroupOrder, an extra priority key. It does not turn the subtree into one isolated block: opaque, transmissive and transparent descendants still go into their own lists, a nestedGroupreplaces the value for its own subtree, and two groups with the same value are interleaved by the next keys. PlainObject3Dparents set nogroupOrder.- Double-sided transparent materials are drawn twice: back faces, then front faces, unless
material.forceSinglePass = true. That makes closed convex shapes correct, and it costs CPU — see the measurements.
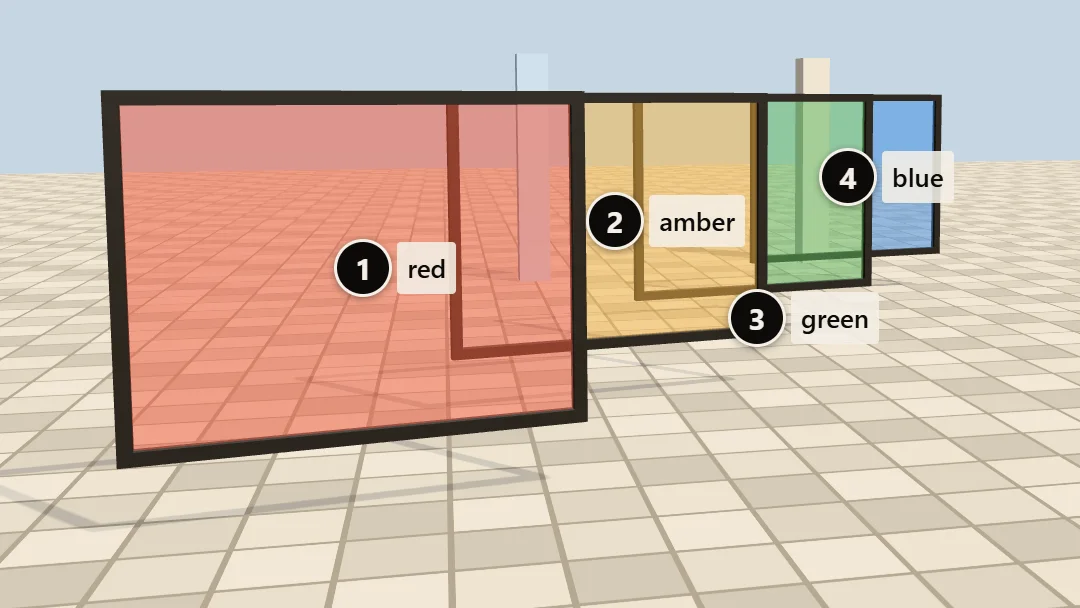
renderer.sortObjects = false: panes are drawn in scene-graph order (red first). Each one writes depth, so the panes behind fail the depth test exactly where they overlap a pane drawn earlier.depthWrite: why objects vanish behind glass
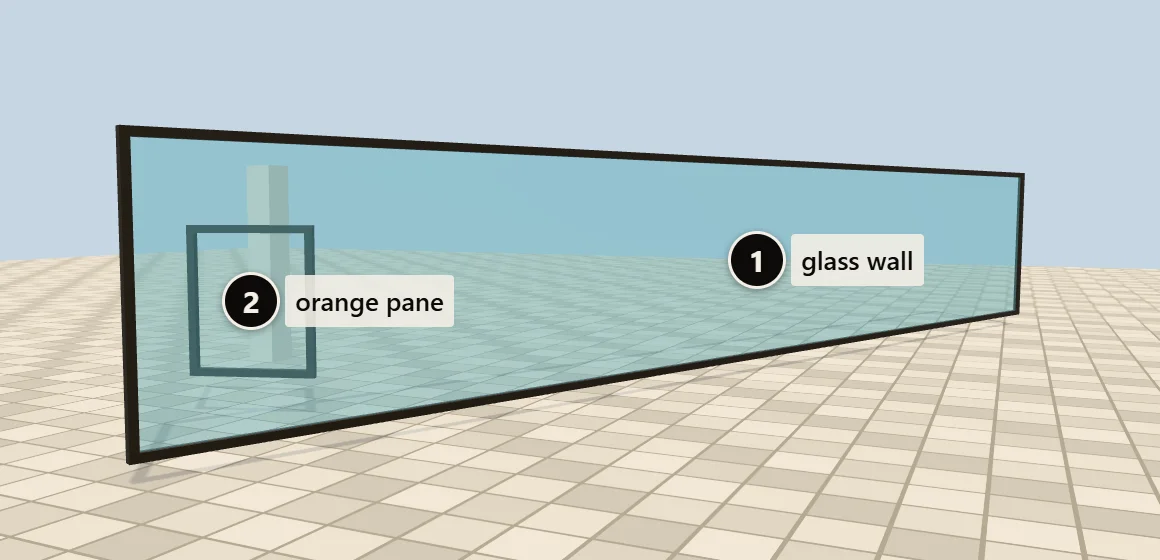
depthWrite: true. Draw order wall → small. The orange glass is gone; only its opaque frame survives.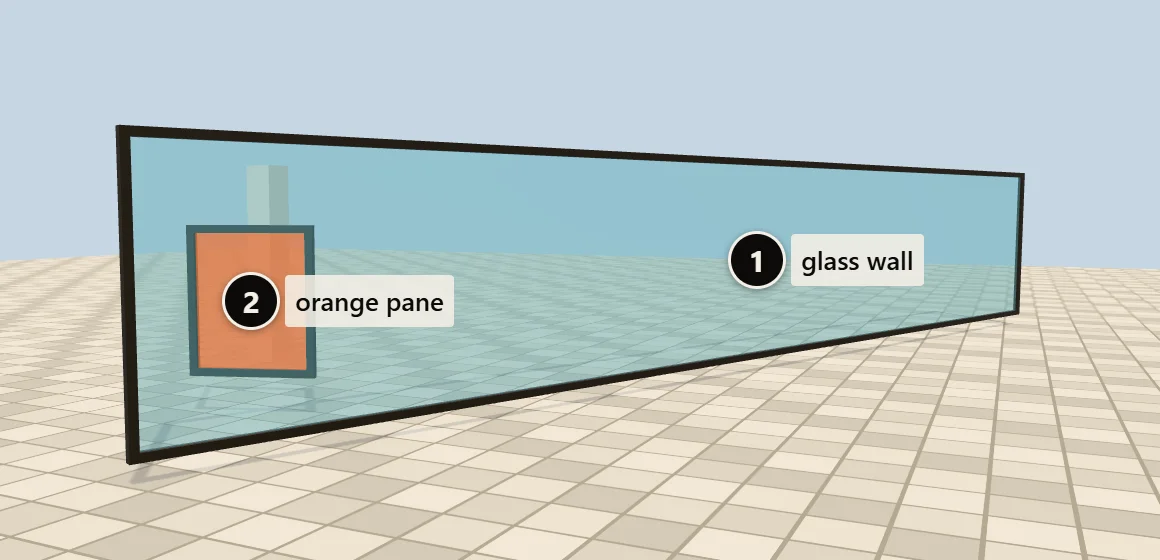
depthWrite: false on both. Same order; now the orange pane is drawn over the wall it stands behind.Materials default to depthWrite: true, transparent ones included. A transparent surface drawn early writes its depth; anything behind it that is drawn later fails the depth test and is never blended at all. That is the classic “my object disappears behind glass” bug: the object is not hidden by the glass, it is skipped. Opaque parts survive because they were drawn in the opaque pass, before the glass.
Turning depthWrite off on the glass removes the holes: nothing is skipped any more. But now the order alone decides what ends up on top, and when the order is wrong — as here, for reasons explained in the next section — the farther object is painted over the nearer one, untinted. Neither image is right; they are two symptoms of the same wrong order.
| Surface | depthWrite | Why |
|---|---|---|
| Glass, water, force fields, UI panels in 3D | false | You look through them; they should never hide what is behind |
| Particles, smoke, glows, soft decals | false | Quads overlap constantly; depth writes cut rectangles (shown below) |
| A convex closed shell seen from outside (a bubble, a capsule) | true or two-pass | Hides its own back faces; for non-convex shapes the result still depends on triangle order |
| An opaque object fading in or out | alpha instead | Stays in the opaque list with correct depth; needs TAA or similar to hide the noise |
| Leaves, grass, fences | cut-out instead | alpha or alpha: opaque list, depth is correct per pixel |
One point per object: when the sort picks the wrong order
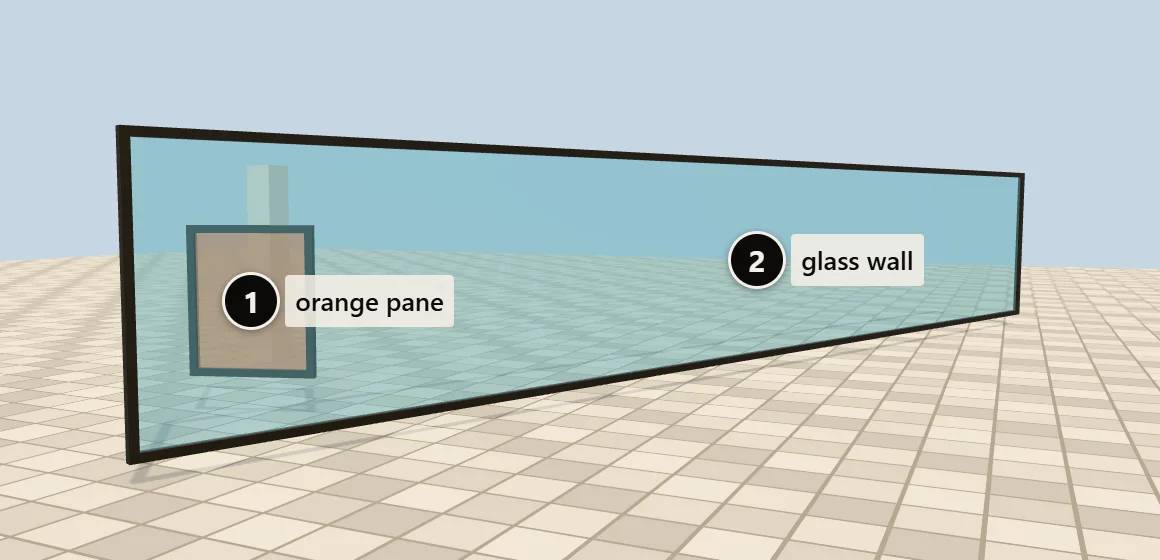
orange.renderOrder = -1: order small → wall. The wall now tints the pane behind it.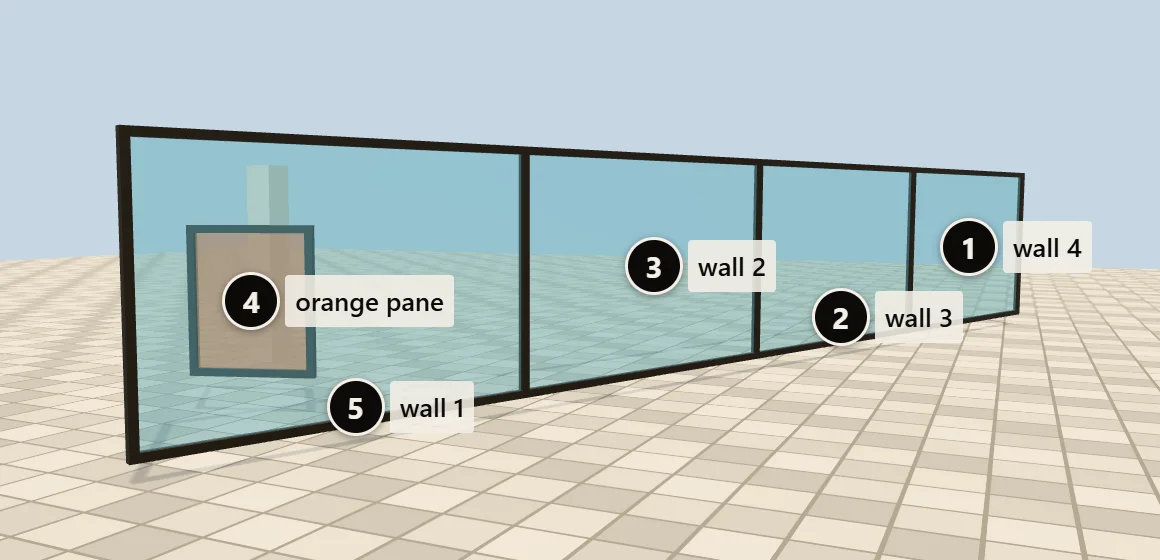
wall4 → wall3 → wall2 → small → wall1. The orange pane lands between segments without any manual order.Why was the order wrong? The wall is 14 m long and seen at a steep angle. Its bounding-sphere centre is in the middle of the wall, far from the camera; the small pane is behind the near end of the wall but its centre is closer than the wall’s. Back to front by centres, the wall comes first. No setting fixes that in general — any single point per object can be beaten by a large object at an angle — so there are two practical fixes:
// 1. Pin the pair: lower renderOrder is drawn earlier, whatever the distances.
orangePane.renderOrder = -1;

// Or raise the priority of a subtree: only a THREE.Group sets groupOrder.
const windows = new THREE.Group();
windows.renderOrder = 10;  // in each list, after items with groupOrder 0
windows.add(windowA, windowB);

// 2. Split large transparent meshes so their centres sit near the surfaces they cover:
//    wall segments, one mesh per window, water in tiles.
renderOrder is a fixed order: right for a pair that never changes sides (a decal over a wall, a window over its interior), wrong when the camera can walk around both. Splitting reduces these errors without manual bookkeeping — pieces of similar size sort more reliably — at the price of a few extra draw calls; it cannot fix pieces that still intersect. Sorting is cheap — see the measurements — so dozens of transparent meshes are fine. The long-running forum thread “ThreeJS and the transparent problem” ends in the same place: renderOrder fixed the author’s case and broke ordering against other objects.
No order is right: intersections and self-overlap
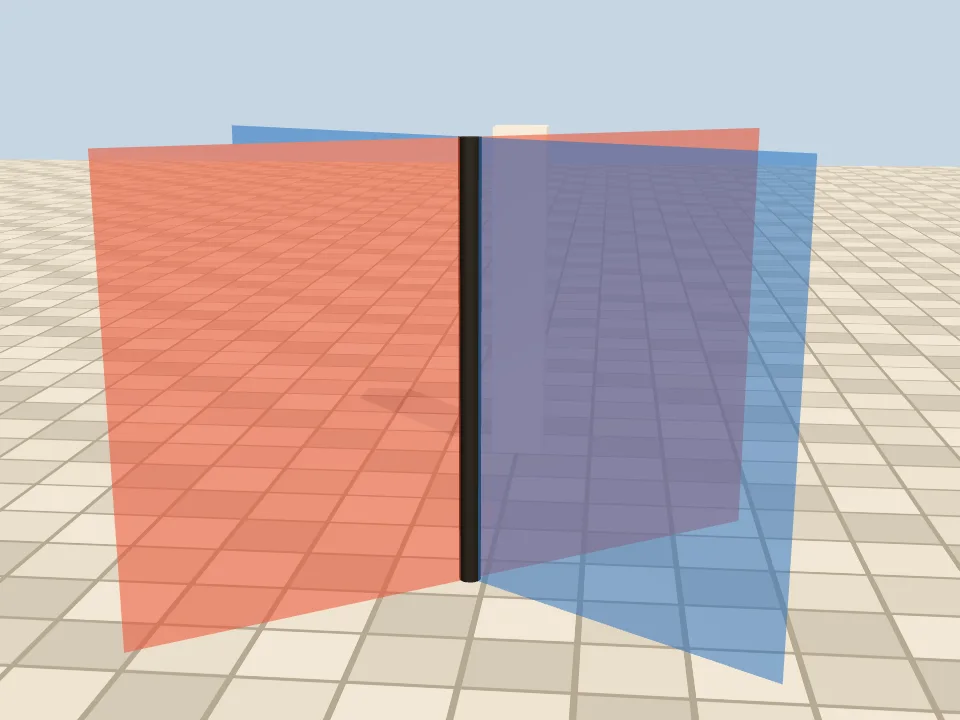
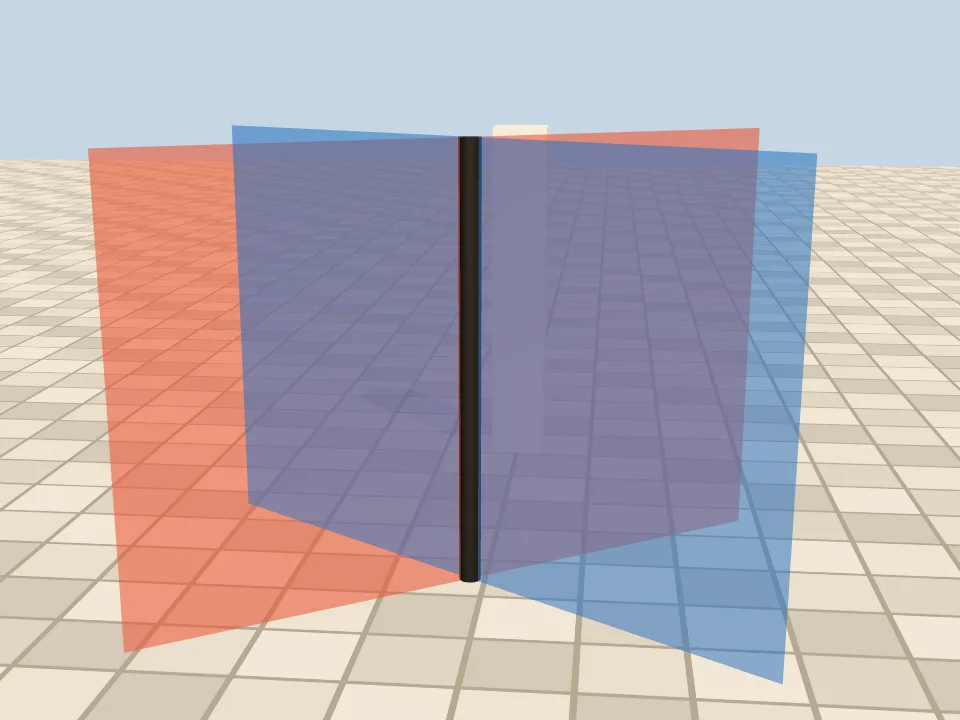
depthWrite: false: nothing missing, but on the left blue is painted over red.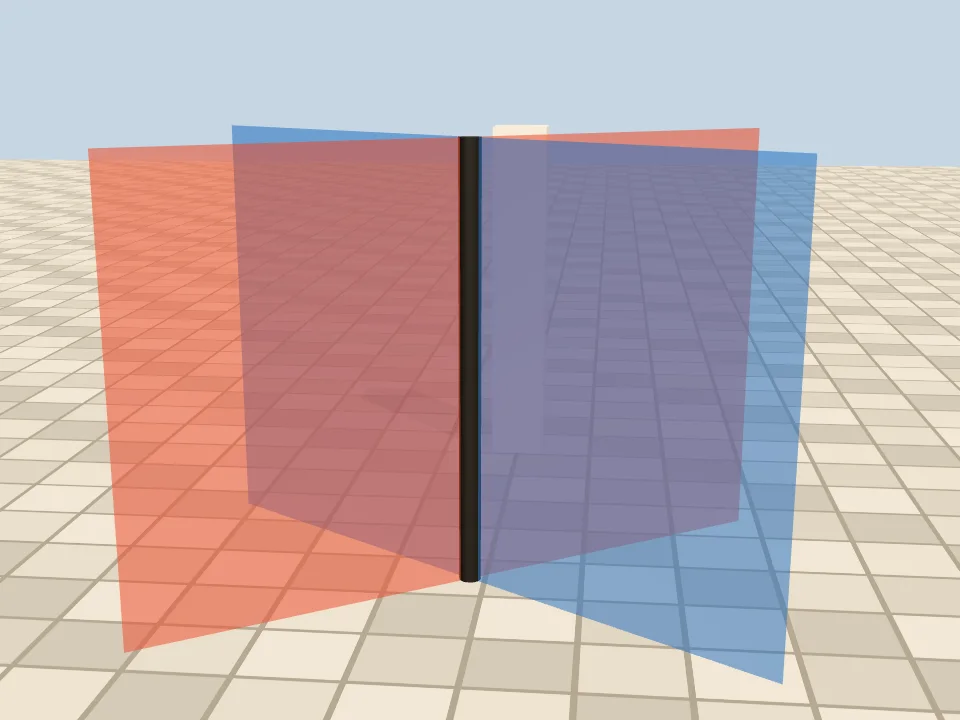
When two transparent objects intersect, each one is partly in front of and partly behind the other. Any object order is wrong for half the overlap, from every camera angle. The exact fix is to cut the geometry along the intersection so every piece is entirely on one side. When that is impractical — animated objects, many intersections — use one of the order-independent options in the next section.
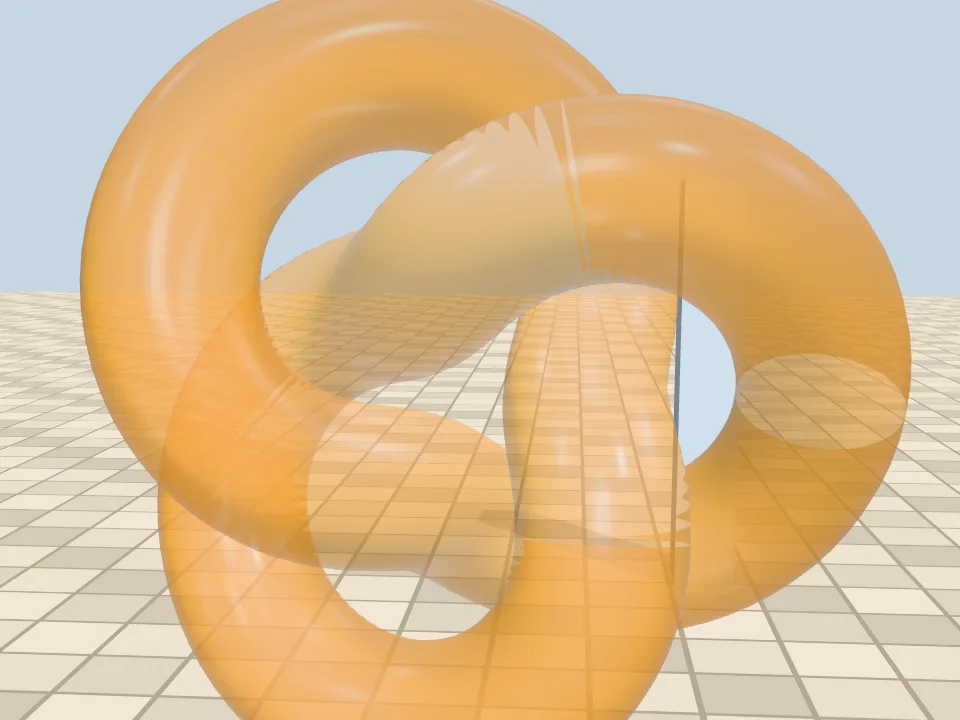
forceSinglePass: true: back and front faces mixed in index order; inner surfaces cut off where front faces came first.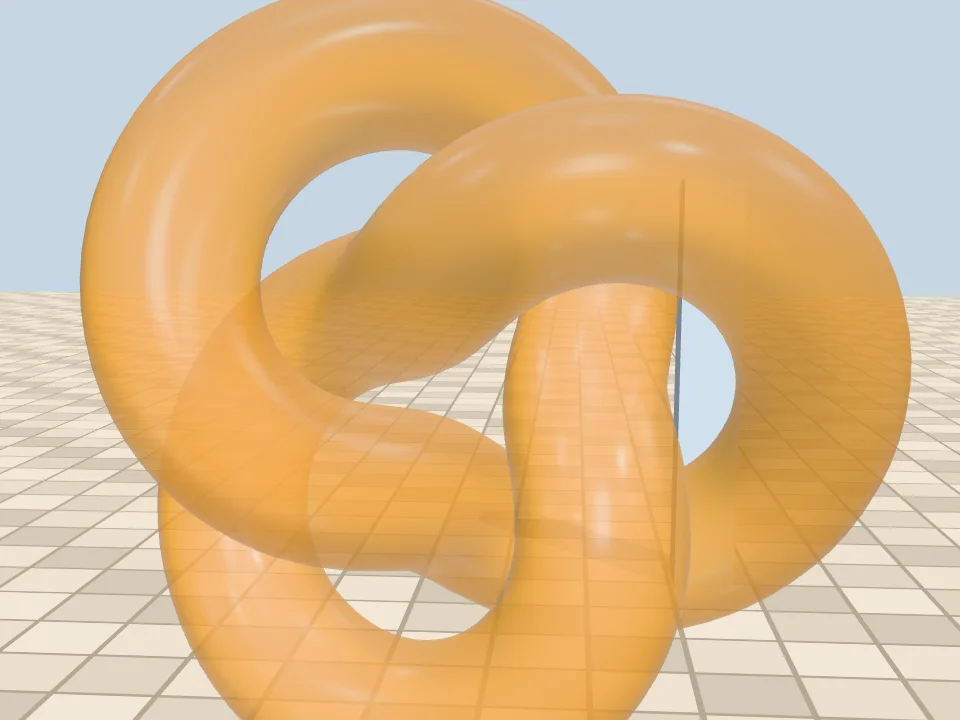
DoubleSide + transparent: all back faces, then all front faces.The same happens inside one mesh, because triangles are never sorted. The default two-pass mode for double-sided transparent materials fixes closed convex shapes completely. A knot is not convex: where one front-facing tube passes in front of another, their order still comes from the index buffer. For a voxel city where one chunk mesh holds many glass faces, or for trees drawn as a Points cloud, this is the whole story — both came up in 2026 forum threads (“How to make true glass and not a bug?”, “How to make the trees in this scene render correctly?”).
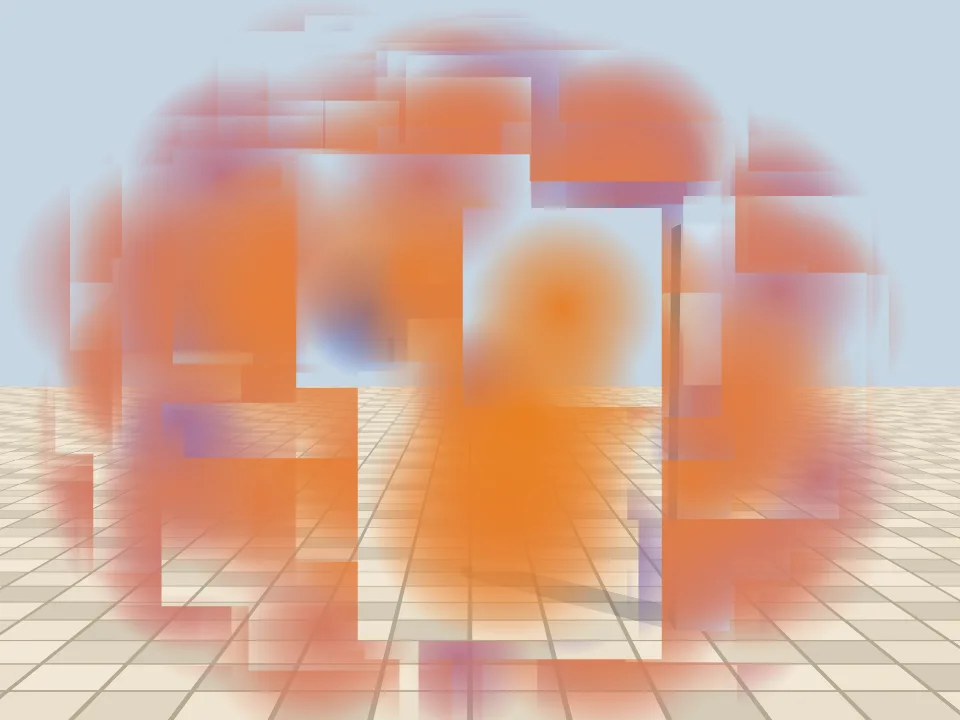
depthWrite: true: each quad’s transparent corners still write depth and cut rectangles.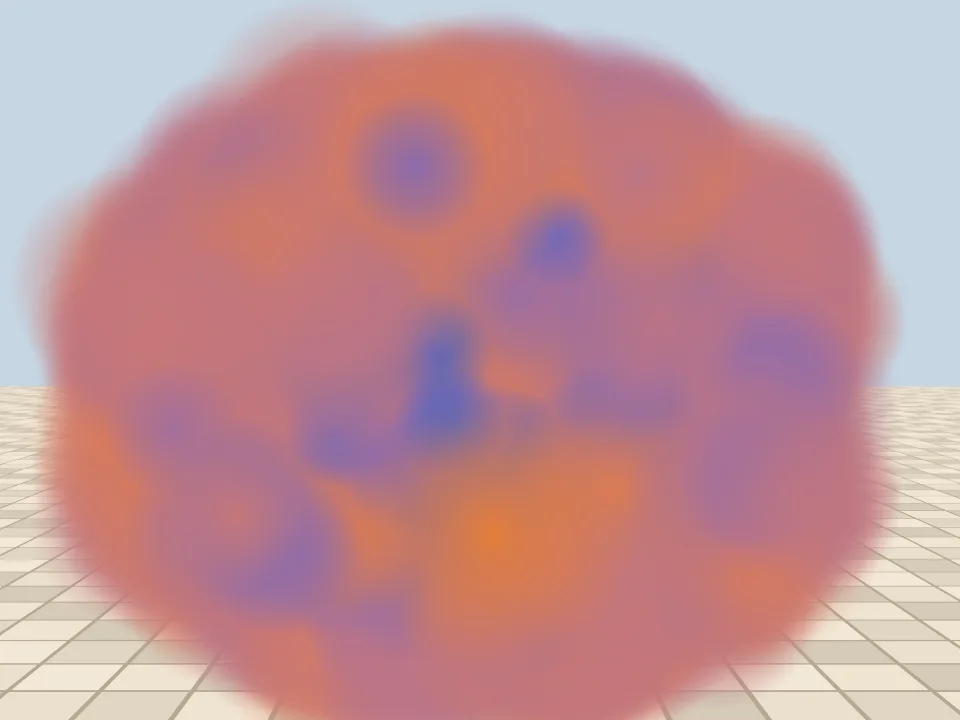
depthWrite: false, unsorted: no holes, but back (blue) puffs land on top of front (orange) ones.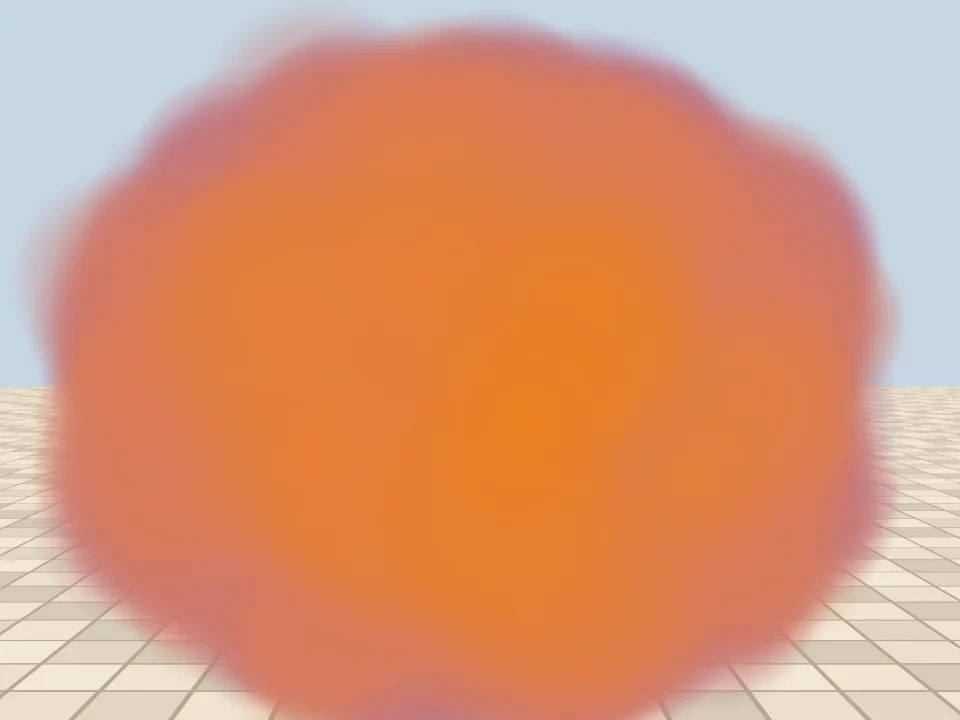
AdditiveBlending: order no longer matters, but it can only brighten.For particles, sprites and grass blades merged into one geometry, the standard fix is to re-sort the index buffer on the CPU whenever the camera, the mesh or the particles move. With quads it is a sort of one depth per quad. The centres below are in the geometry’s local space, so the depth uses the mesh’s world matrix as well as the camera:
// centers: Float32Array(n * 3), quad centres in local (geometry) space
// base: copy of the original index array, 6 indices per quad
const depth = new Float32Array(n);
const order = new Uint32Array(n).map((_, i) => i);
const viewModel = new THREE.Matrix4();

function sortQuads(mesh, camera) {
  // local → view space (matrixWorld must be up to date)
  viewModel.multiplyMatrices(camera.matrixWorldInverse, mesh.matrixWorld);
  const e = viewModel.elements;   // view-space z = row 3
  for (let i = 0; i < n; i++) {
    const x = centers[i * 3], y = centers[i * 3 + 1], z = centers[i * 3 + 2];
    depth[i] = e[2] * x + e[6] * y + e[10] * z + e[14];
  }
  order.sort((a, b) => depth[a] - depth[b]);   // most negative = farthest first
  const idx = mesh.geometry.index.array;
  for (let k = 0; k < n; k++) {
    for (let j = 0; j < 6; j++) idx[k * 6 + j] = base[order[k] * 6 + j];
  }
  mesh.geometry.index.needsUpdate = true;   // re-uploads the index buffer
}

// Each frame, before renderer.render(): matrices may still hold
// last frame if you changed transforms since then.
camera.updateWorldMatrix(true, false);   // also refreshes matrixWorldInverse
mesh.updateWorldMatrix(true, false);
sortQuads(mesh, camera);
// Needed when the camera, the mesh or its parents move,
// and after you update the centres of moving particles.
It cost 0.06 ms per frame for 1,000 quads, 0.68 ms for 10,000 and 5.6 ms for 50,000 in our test — fine for effects, a real budget item for big grass fields (where alphaTest needs no sorting at all). Additive blending is order-free and right for fire, sparks and light; it cannot darken, so smoke and dust need normal blending and the sort.
Order-independent options: alphaHash and weighted blended OIT
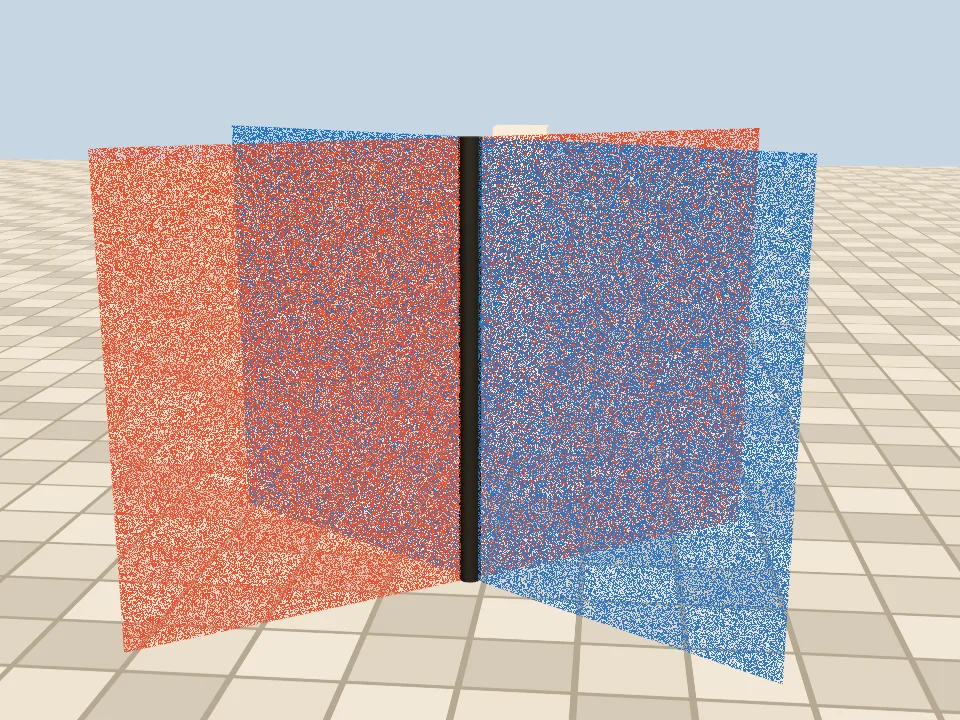
alphaHash: true, one frame: order-independent, but noisy.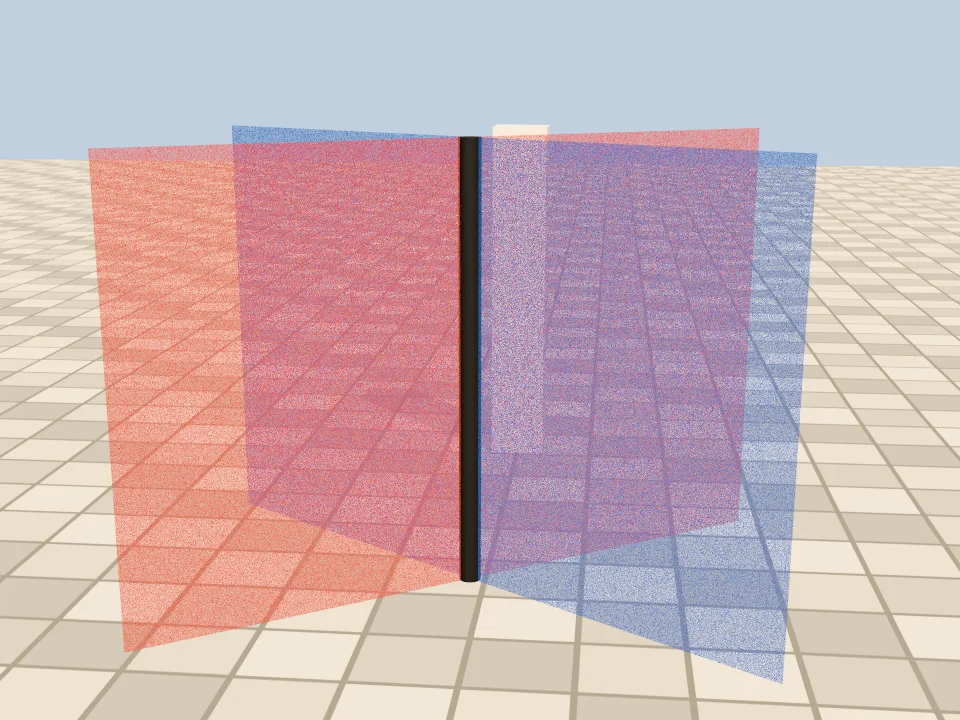
SSAARenderPass).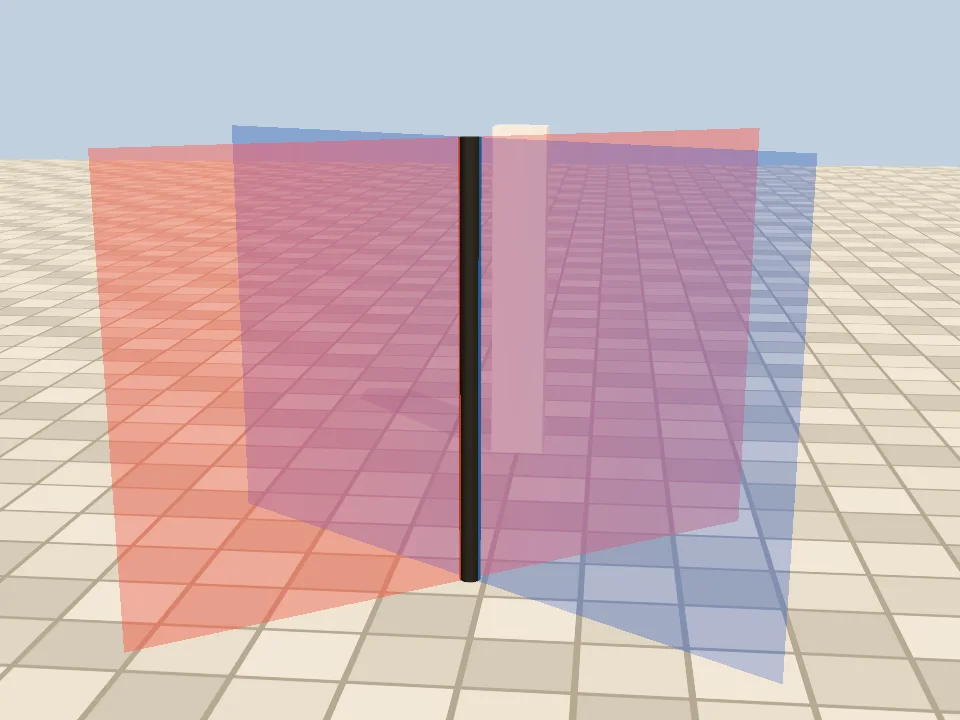
alphaHash turns opacity into a stable random pattern: a pixel is either drawn fully, with depth, or discarded. It belongs to the opaque list, so order never matters and depth is right per pixel. A single frame is noisy; it becomes smooth only when something averages several frames or samples — TAARenderPass, SSAARenderPass, or the temporal AA in your own pipeline. Use it for fades (LOD cross-fades, objects appearing) and for distant foliage when you already run TAA.
Advanced. The rest of this section needs render targets, a depth texture and shader patching; skip to the next section if you only need the practical fixes.
Weighted blended OIT (McGuire and Bavoil, 2013) replaces “over” blending with a weighted average that is independent of order: every transparent fragment adds its colour × alpha × weight into one buffer and multiplies its (1 − alpha) into another; a full-screen pass divides and composites over the opaque image. It is not in three.js core. Below is the heart of our implementation, the material patch; a working version also needs the three render targets, layer handling, resizing and the composite pass, so read it as an illustration of the technique rather than a drop-in recipe:
// 1. opaque scene → opaqueRT (HalfFloat + DepthTexture);
//    transparent meshes moved to layer 1 so they are skipped
// 2. transparent meshes → accumRT (cleared to 0) and revealRT
//    (cleared to 1), with materials patched like this:
function oitMaterial(src, pass) {
  const m = src.clone();
  Object.assign(m, {
    transparent: true, depthWrite: false, depthTest: false,
    side: THREE.DoubleSide, forceSinglePass: true,
    blending: THREE.CustomBlending, blendEquation: THREE.AddEquation,
  });
  if (pass === 'accum') { m.blendSrc = m.blendSrcAlpha = THREE.OneFactor; m.blendDst = m.blendDstAlpha = THREE.OneFactor; }
  else { m.blendSrc = m.blendSrcAlpha = THREE.ZeroFactor; m.blendDst = m.blendDstAlpha = THREE.OneMinusSrcColorFactor; }
  m.onBeforeCompile = (sh) => {
    sh.uniforms.tDepth = { value: opaqueRT.depthTexture }; sh.uniforms.uRes = { value: new THREE.Vector2(w, h) };
    sh.fragmentShader = 'uniform sampler2D tDepth; uniform vec2 uRes;\n' + sh.fragmentShader
      .replace('void main() {', 'void main() {\n if (gl_FragCoord.z > texture2D(tDepth, gl_FragCoord.xy / uRes).r) discard;')
      .replace(/}\s*$/, `
        float a = gl_FragColor.a, z = 1.0 / gl_FragCoord.w;          // view depth
        float wt = a * clamp(10.0 / (1e-5 + pow(z / 5.0, 2.0) + pow(z / 200.0, 6.0)), 1e-2, 3e3);
        ${pass === 'accum' ? 'gl_FragColor = vec4(gl_FragColor.rgb * a, a) * wt;' : 'gl_FragColor = vec4(a);'}
      }`);
  };
  m.customProgramCacheKey = () => 'oit-' + pass;
  return m;
}
// 3. full-screen quad to the canvas:
//    avg = accum.rgb / max(accum.a, 1e-5);
//    color = mix(avg, opaque.rgb, reveal.r);  then tone mapping + sRGB
The trade-off is built into the method. Weighted blended OIT gets the total coverage right but replaces the order with a depth-based weight, so the colours of overlapping layers are pulled towards an average — clearly visible when layers differ in colour and sit at similar depths, as in this cloud. It suits approximate transparency where that is acceptable, such as tinted panes, holograms or overlapping UI in 3D; it is not a substitute for correct ordering. It also needs its own render targets and a second and third pass over the transparent meshes: 7.7 ms of GPU time for 5,000 puffs, against 3.2 ms sorted and blended directly (3.7 ms through an EffectComposer). Depth peeling and per-pixel linked lists are exact, and much more expensive; neither is in three.js.
Same opacity, two looks: blending before or after sRGB
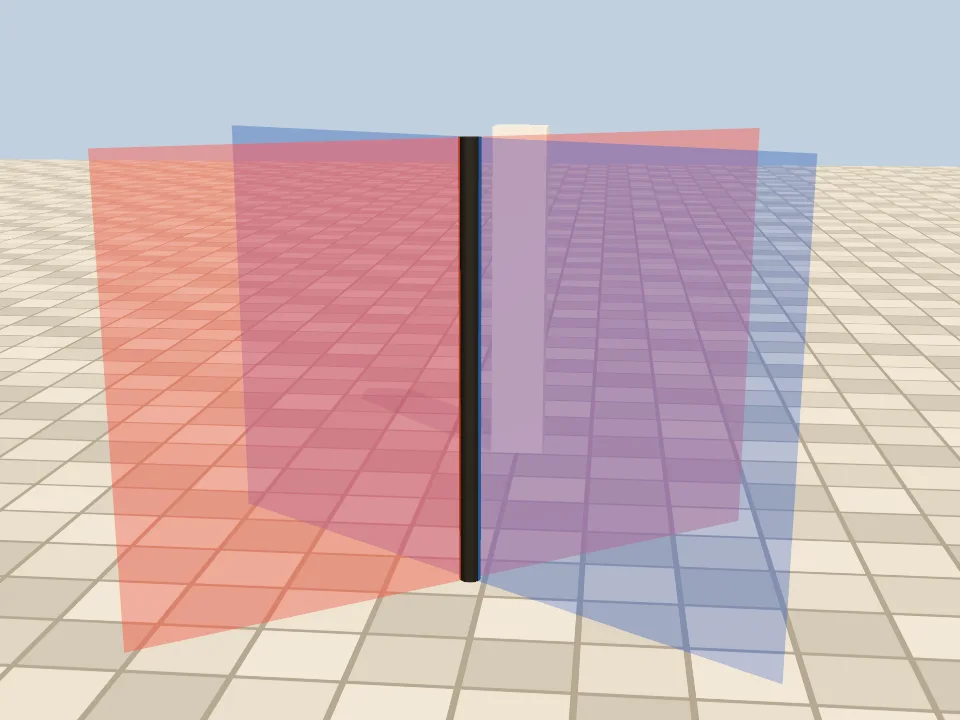
EffectComposer → OutputPass: blended in linear values.Same scene, same opacity: 0.55, two different images. When three.js renders straight to the canvas, each material’s shader applies tone mapping and the sRGB conversion before the GPU blends, so blending happens on display values. Through a composer, the scene is drawn into a linear half-float target, blended there, and converted once at the end by OutputPass. Linear blending is the physically sensible one — a 50% red over white looks lighter — but neither is a bug. This is a common reason transparency changes when you add post-processing, but not the only one: a missing OutputPass, different tone mapping or exposure, the render target type and the passes themselves all change the image. Make sure the pipeline is right first; retune opacities only after that.
Always on top: renderOrder, depthTest and an overlay pass
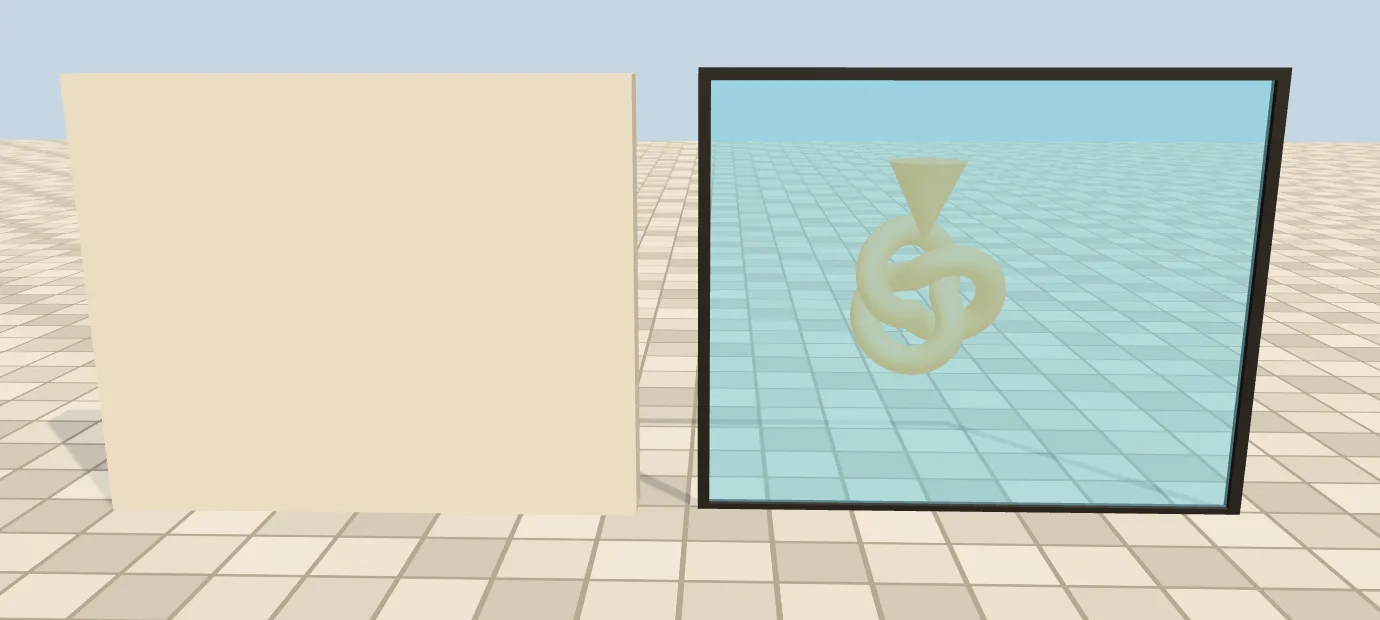
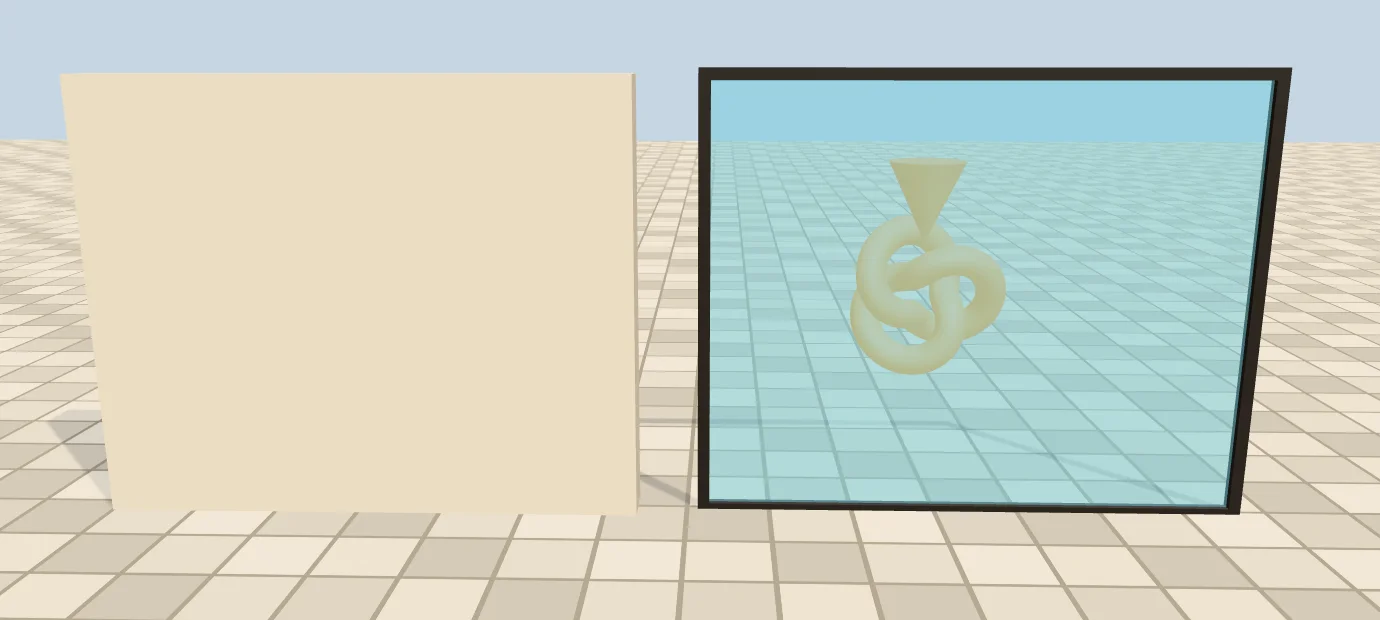
renderOrder = 999: no change at all.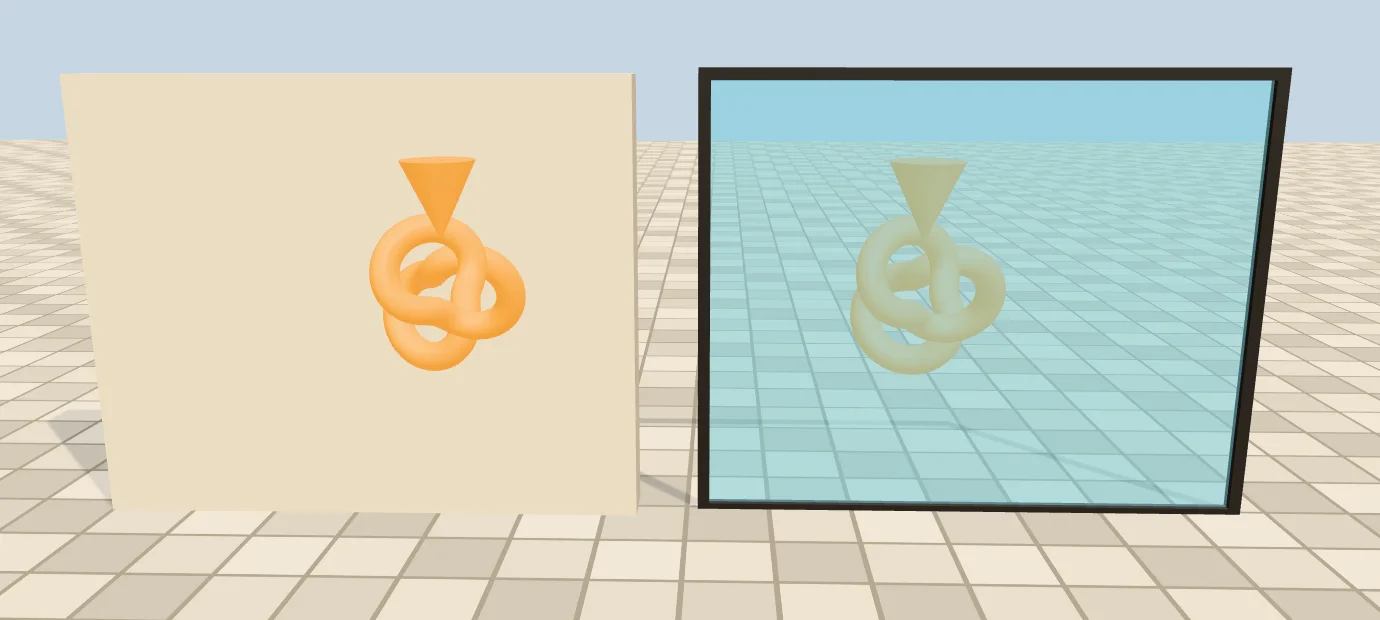
depthTest: false + renderOrder: through the wall, still under the glass.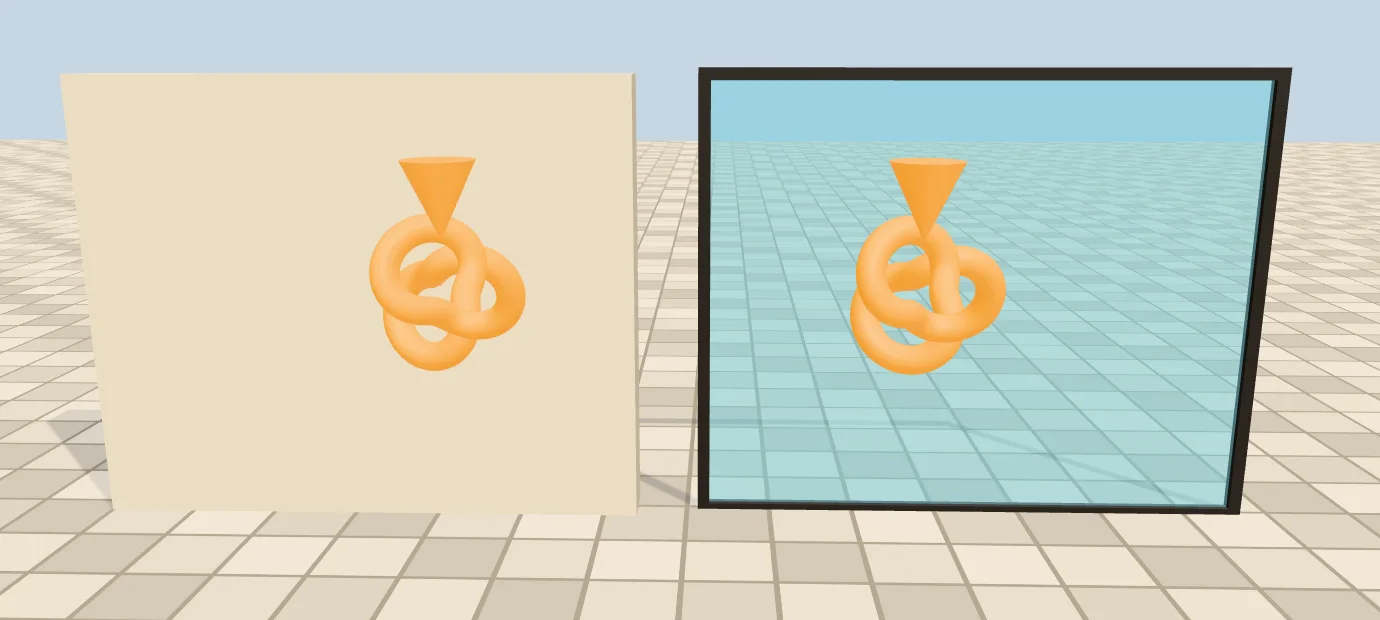
transparent: true: on top of everything.This is the “always display mesh on top of transparent object” question (forum, September 2026). renderOrder only orders meshes within the list they are in, and the opaque list is always drawn before the transparent one. An opaque marker with renderOrder = 999 is the last opaque mesh, and then all the glass is drawn over it. Turning off depthTest lets it pass through opaque walls but not through glass drawn later. Only when the marker is also transparent does it join the last list and get drawn last:
// Option A: one scene. The marker joins the transparent list, is drawn last and ignores depth.
marker.traverse((o) => {
  if (!o.isMesh) return;
  o.renderOrder = 999;            // after other transparent meshes
  for (const m of [].concat(o.material)) {   // imported meshes may use arrays
    m.transparent = true;         // transparent list; opacity can stay 1
    m.depthTest = false;          // through walls
    m.needsUpdate = true;         // the material may already be compiled
  }
});

// Option B: an overlay scene drawn after clearing depth — the marker keeps its own occlusion.
renderer.autoClear = false;
renderer.setAnimationLoop(() => {
  renderer.clear();
  renderer.render(scene, camera);
  renderer.clearDepth();
  renderer.render(overlayScene, camera);   // needs its own lights
});
// EffectComposer: a second RenderPass(overlayScene, camera)
// with clear = false and clearDepth = true.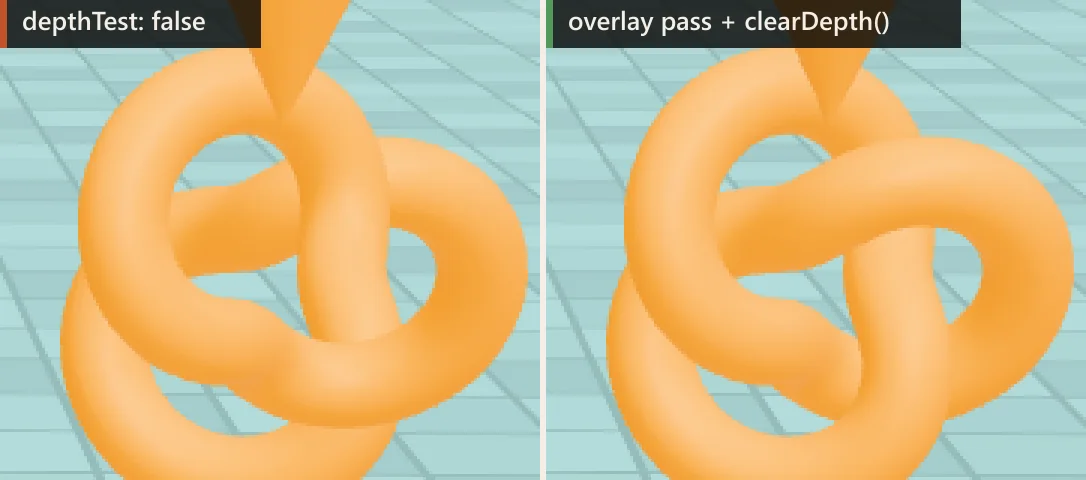
depthTest: false: wherever a tube at the back comes later in the index buffer, it is drawn over the tube in front of it. Right, overlay pass after clearDepth(): on top of the scene and correct within itself.Option A is fine for flat or convex markers (icons, sprites, spheres). Anything with parts that overlap itself — a knot, an arrow over a base, a character — needs depth among its own triangles, and that is what the overlay pass keeps. It costs one extra render() call with only the overlay objects in it.
Trees and foliage: alphaTest, alphaToCoverage, alphaHash or blending
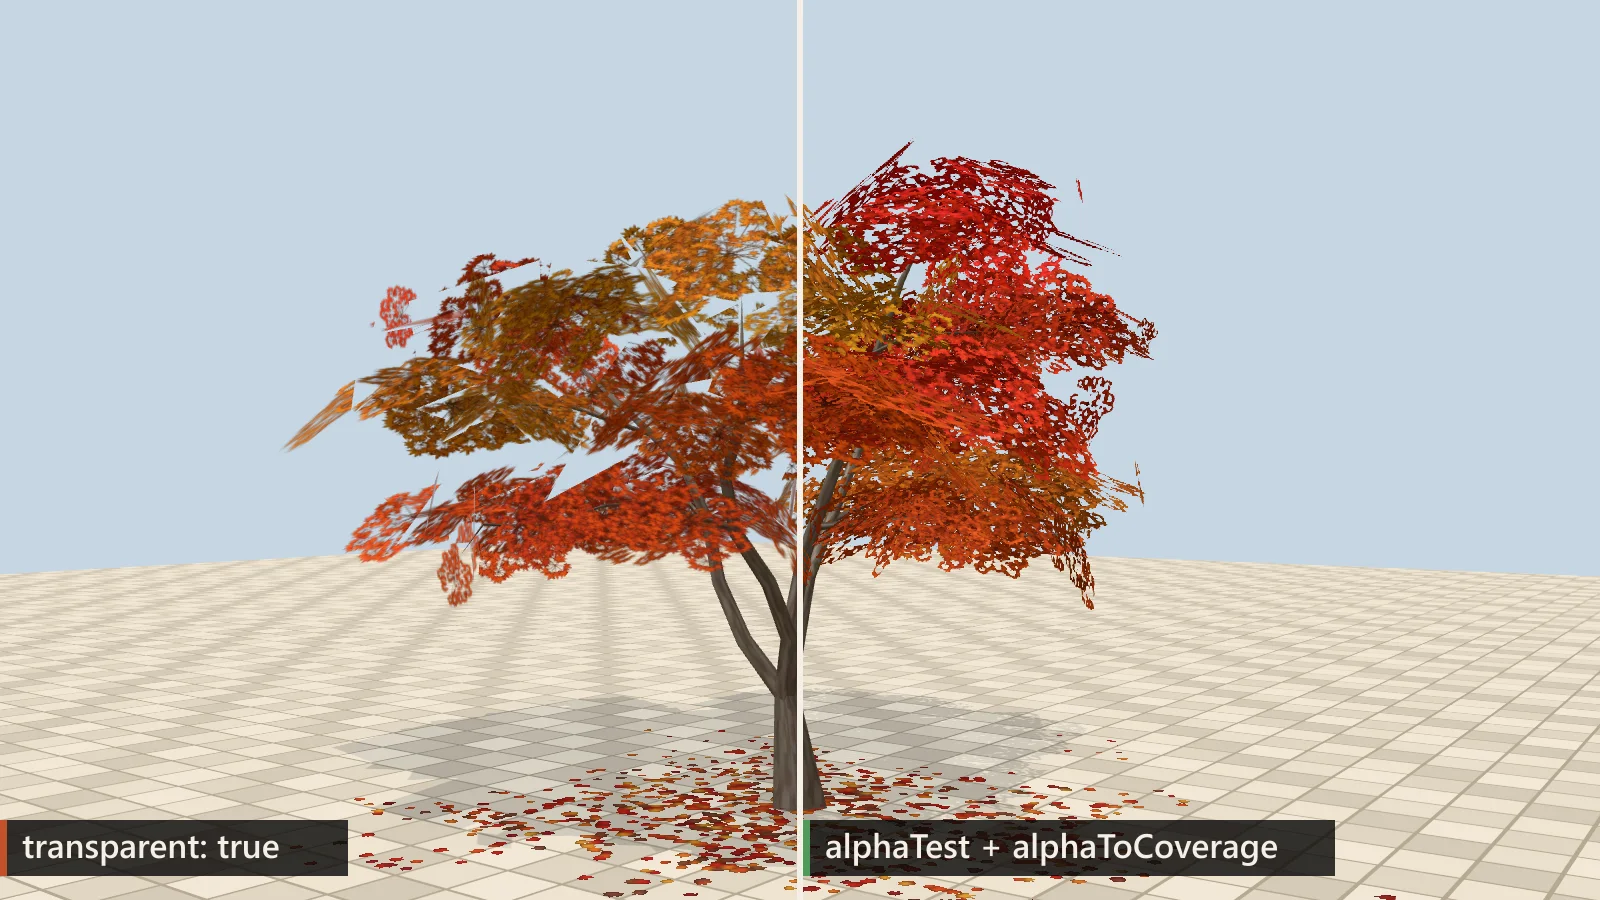
transparent: true). Right: alphaTest: 0.5 + alphaToCoverage with MSAA — what the file ships with, plus coverage.The tree is from our Japan pack: leaf cards with a 512×512 alpha texture, exported with glTF alphaMode: MASK. GLTFLoader turns MASK into alphaTest = alphaCutoff (0.5 here) with transparent: false, so the leaves are in the opaque list and need no sorting. alphaMode: BLEND becomes transparent: true with depthWrite: false — so a tree exported as BLEND arrives with the wrong-order look below. The renders below change only the leaf materials.
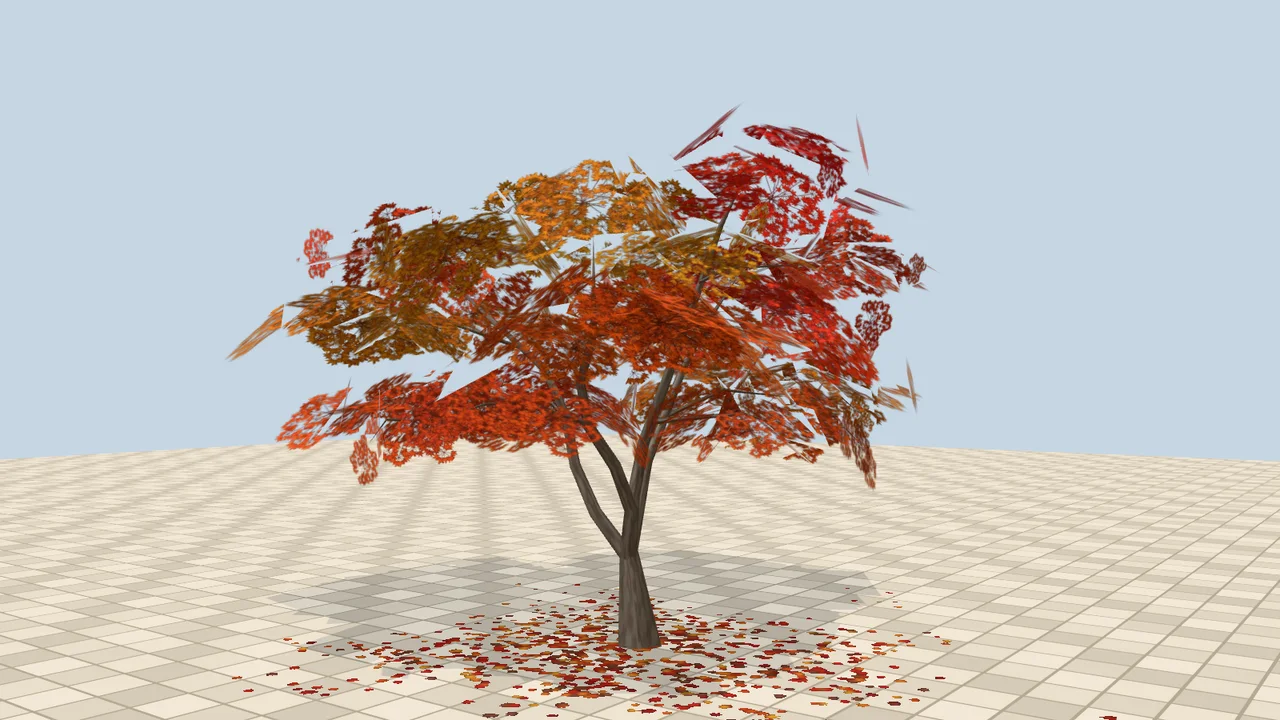
transparent: true, depthWrite on: fringes of front cards write depth and cut the leaves behind them.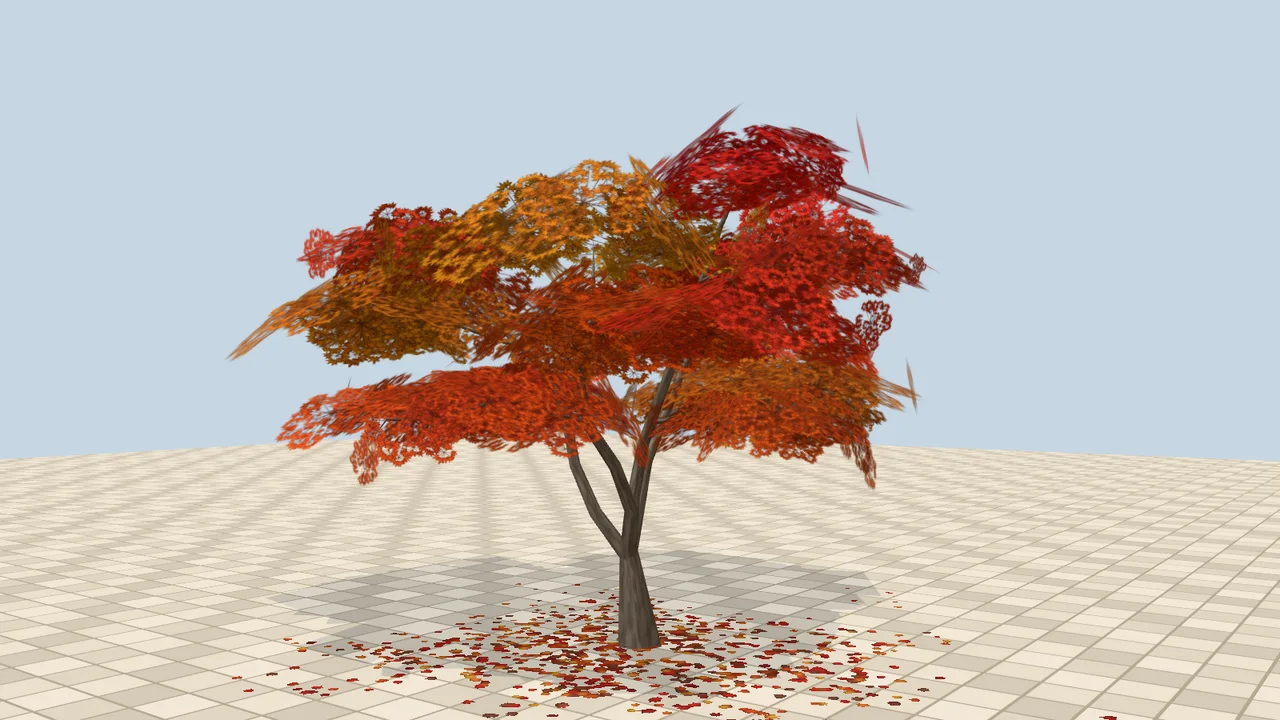
depthWrite: false: no shards, but leaves from the back of the crown are painted over the front.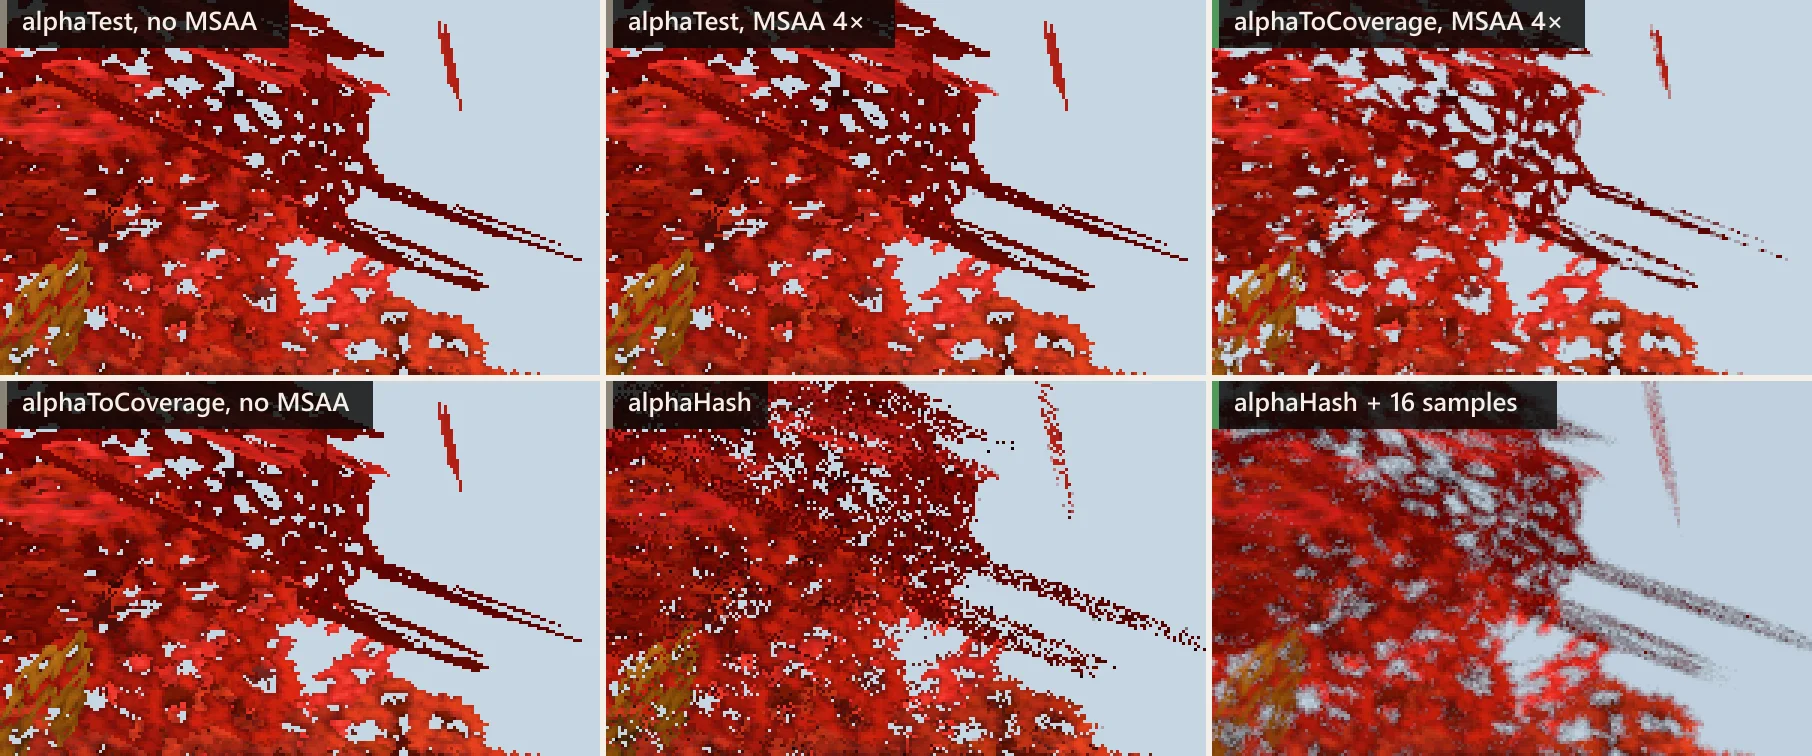
alphaToCoverage turns alpha near the cut-off into a partial sample mask, so the edge gets MSAA’s gradient. Without MSAA there is only one sample, and it behaves like alphaTest.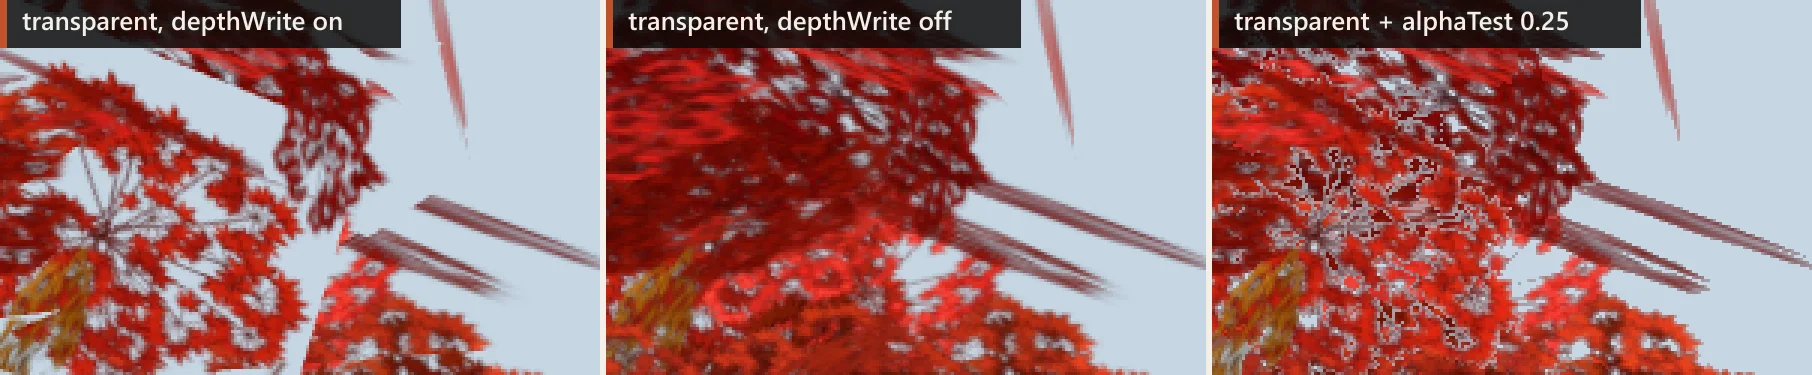
depthWrite: false they disappear.For foliage, grass, fences and similar cards the preferred choice is the cut-out family: alphaTest, and alphaToCoverage whenever MSAA is on. They stay in the opaque list, need no sorting, write correct depth per pixel and, in our forest, cost about the same as each other (measurements). Blending a tree costs 1.9× the GPU time and 2.8× the CPU time and still looks wrong.
const renderer = new THREE.WebGLRenderer({ antialias: true }); // MSAA

leafMaterial.transparent = false;
leafMaterial.alphaTest = 0.5;         // match your texture; 0 → >0 is a new shader
leafMaterial.alphaToCoverage = true;  // MSAA-smoothed edges; needs samples
leafMaterial.needsUpdate = true;      // only if it was already rendered

// With EffectComposer the samples come from its render target:
const target = new THREE.WebGLRenderTarget(w, h, {
  type: THREE.HalfFloatType, samples: 4,
});
const composer = new EffectComposer(renderer, target);
Turning these features on or off changes the compiled shader: alphaTest going from 0 to a positive value (or back), alphaToCoverage, alphaHash and transparent each select a different program variant. Choose them when the material is created; switching them later (for example on an LOD change) compiles a new program mid-frame. In r180 only the alphaTest setter marks the material as changed by itself; for the others set material.needsUpdate = true. Tuning the threshold, say from 0.5 to 0.25, is only a uniform update and compiles nothing. See our article on shader recompilation.
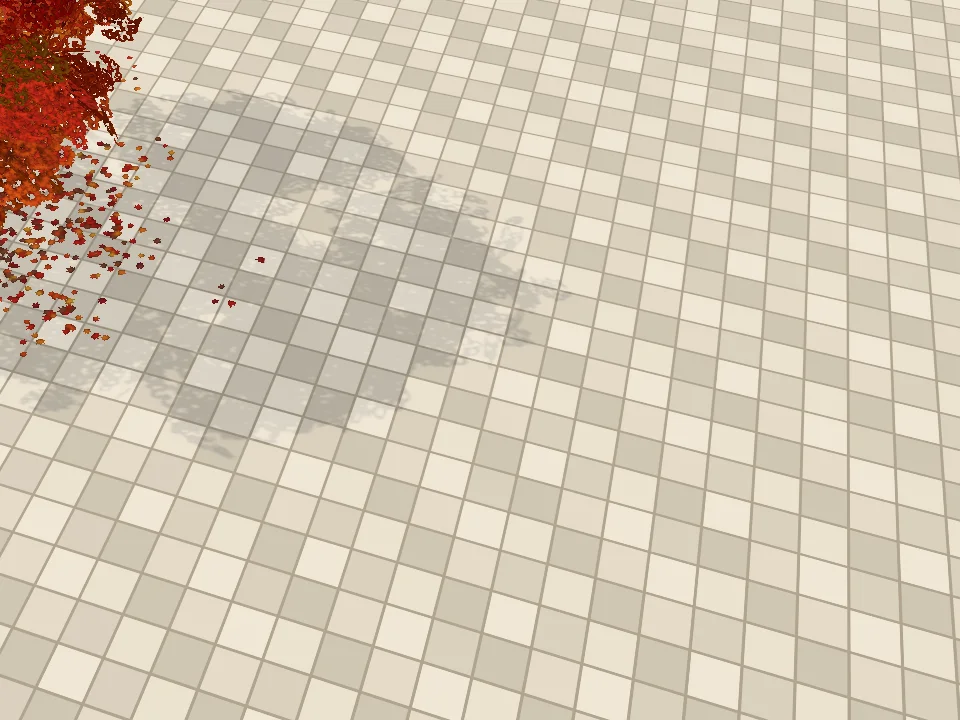
alphaTest: the shadow is cut out like the leaves.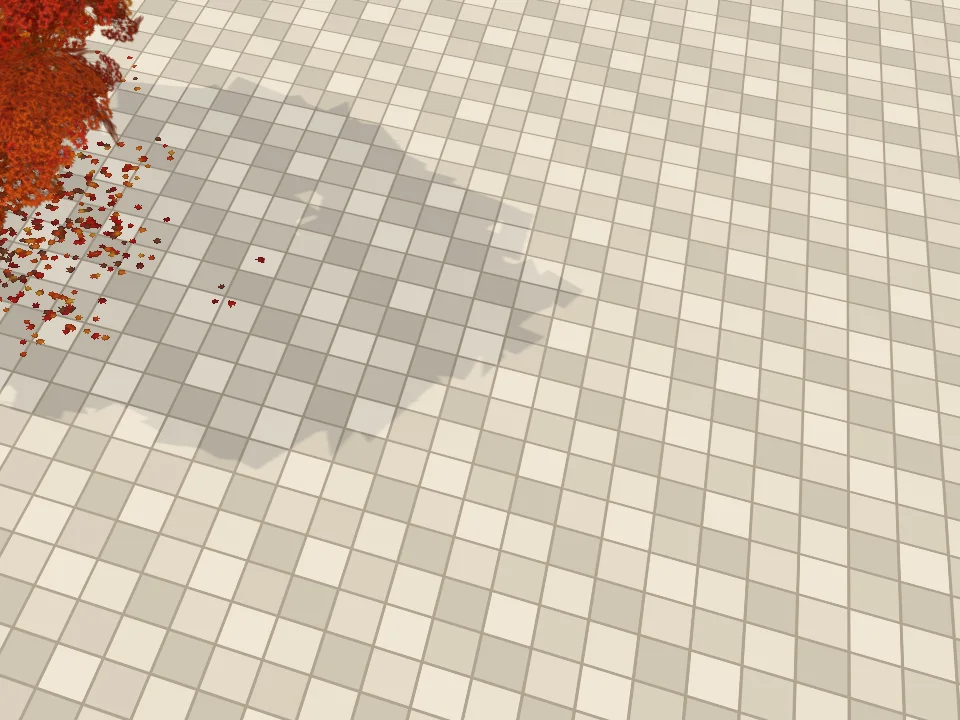
alphaTest: every card casts its full rectangle.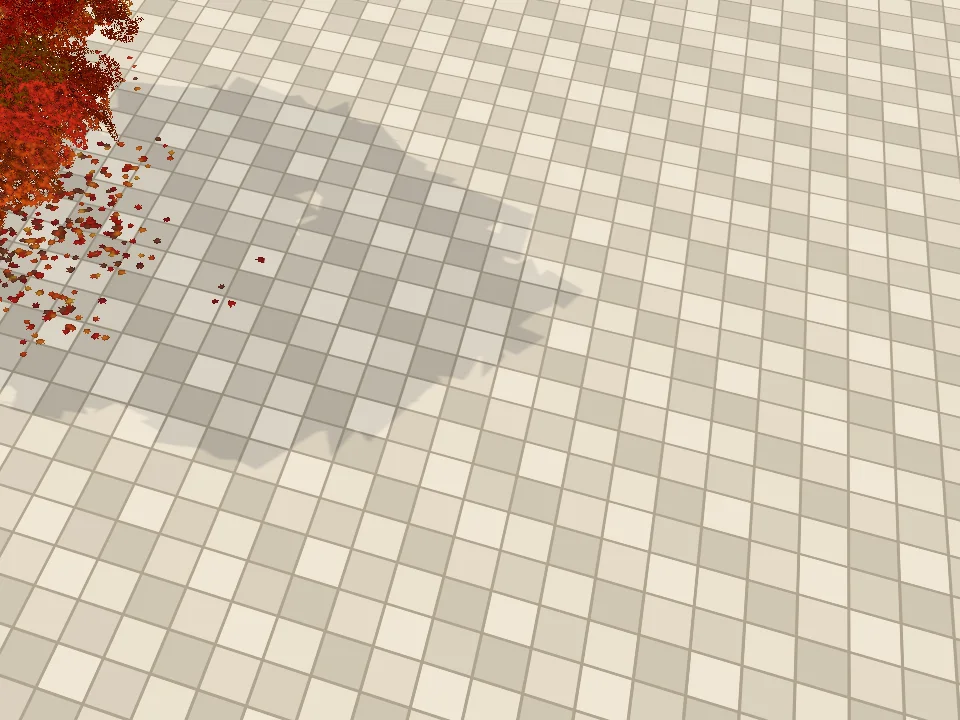
alphaHash: rectangles too.Shadows are a depth-only pass with their own material. In r180 WebGLShadowMap copies map, alphaMap and alphaTest into it — and approximates alphaToCoverage with a fixed 0.5 cut-off — but not blending and not alphaHash. A blended or hashed leaf without alphaTest casts its whole rectangle. There are two separate recipes. Cut-out shadows: set alphaTest on the main material (for example 0.25 if you keep blending for the look). Setting it only on a customDepthMaterial does not work: r180 copies alphaTest, map and alphaMap from the main material onto whichever shadow material it uses, custom ones included. Hashed shadows: give the mesh its own depth materials with alphaHash: true — that flag is not copied, so it survives, while map (the leaf texture with its alpha) is copied in from the main material. A custom MeshDepthMaterial must also use RGBADepthPacking, the packing three.js’s own shadow material uses; its default is BasicDepthPacking. Point-light shadows use customDistanceMaterial instead:
mesh.customDepthMaterial = new THREE.MeshDepthMaterial({
  depthPacking: THREE.RGBADepthPacking,   // not the default
  alphaHash: true,
});
mesh.customDistanceMaterial = new THREE.MeshDistanceMaterial({   // point lights
  alphaHash: true,
});
// Hashes the alpha of the copied map — right for alpha-textured leaves.
// Transparency set through opacity needs its own setup.
Glass and other transparent surfaces cast fully solid shadows for the same reason; turn castShadow off on them.
Glass: opacity versus transmission
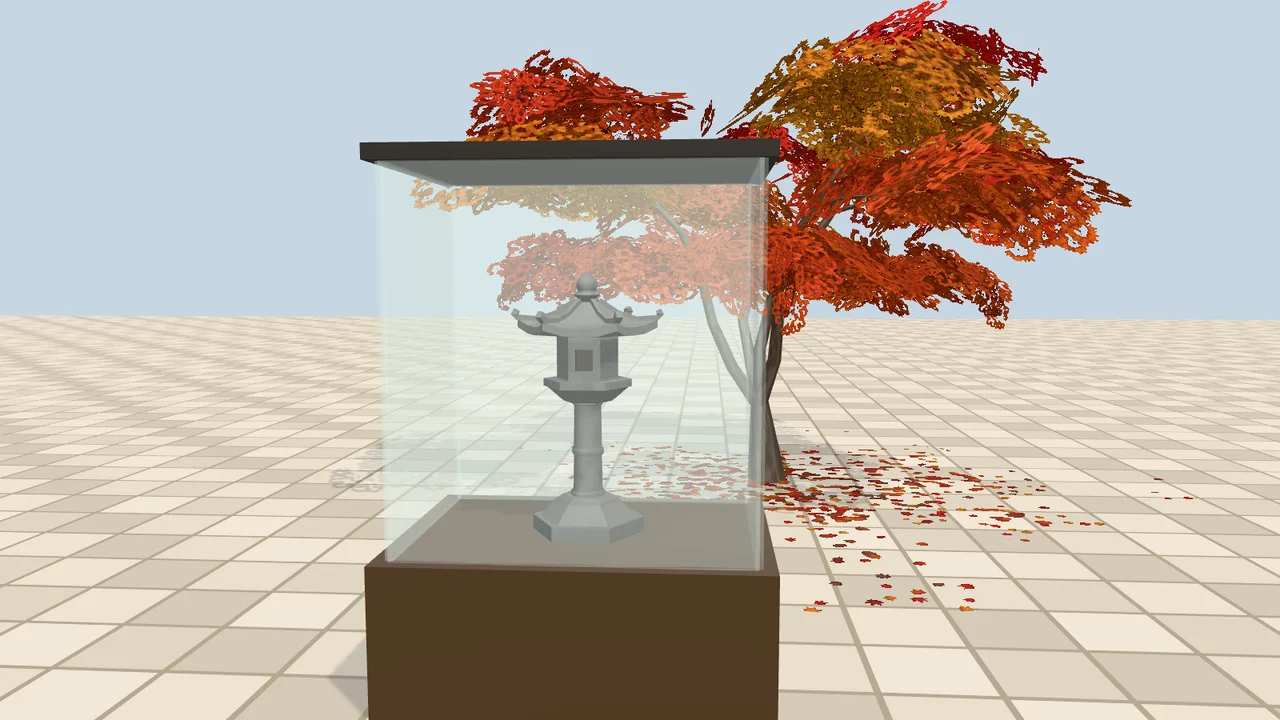
MeshStandardMaterial, opacity: 0.2: milky, weak reflections.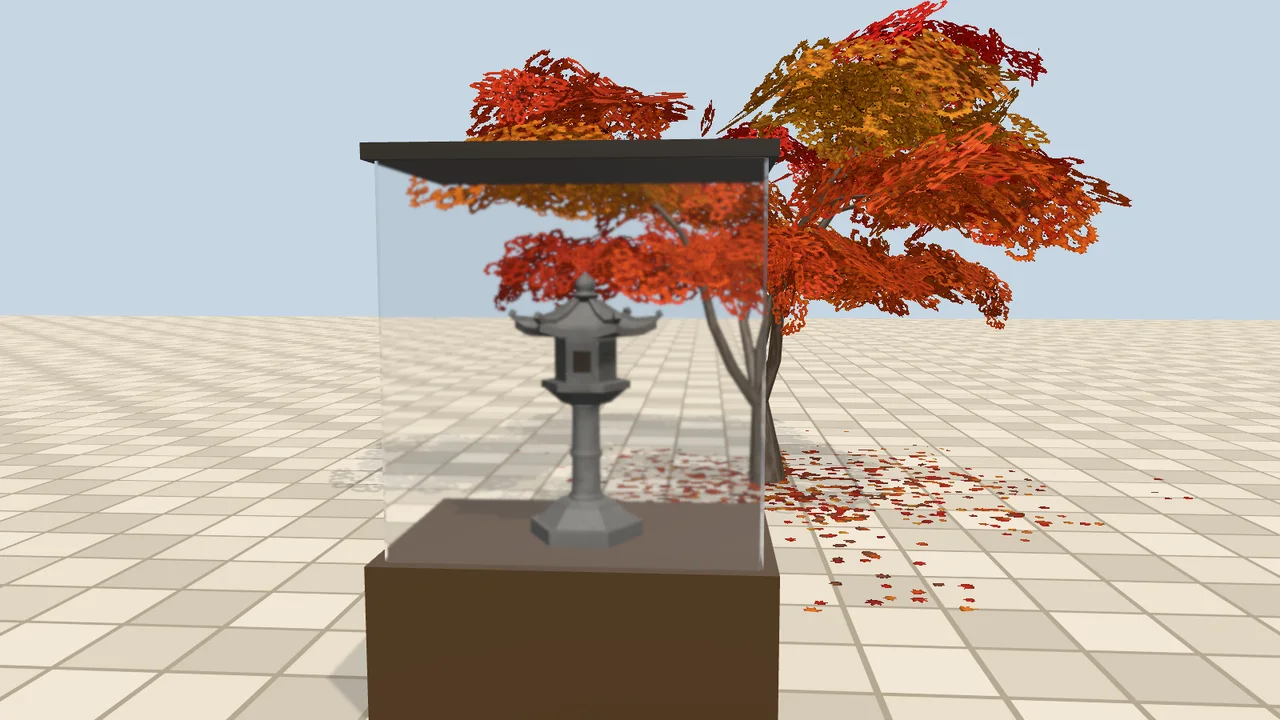
MeshPhysicalMaterial, transmission: 1: clear, reflections at full strength.Opacity glass is a coloured film: opacity scales the whole fragment, reflections included, and the background is mixed with the glass colour. Real glass lets light through and reflects at full strength at grazing angles. transmission does that, and it is what GLTFLoader creates for KHR_materials_transmission:
const glass = new THREE.MeshPhysicalMaterial({
  transmission: 1,      // fraction of light that passes through
  roughness: 0.03,      // > 0 blurs what is behind, via mipmaps of the transmission target
  thickness: 0.08,      // volume thickness in local units (scales with the mesh)
  ior: 1.5,
});
renderer.transmissionResolutionScale = 0.5;   // optional: halve the extra render target
Transmissive meshes are their own list. Before drawing them, three.js renders the background and the opaque list a second time into a half-float, 4× multisampled render target, builds mipmaps, and lets each glass surface sample it with refraction and roughness blur. Not the transparent list, and not other transmissive meshes — only the back faces of double-sided transmissive meshes are added to it. Everything blended is therefore invisible through transmission glass:
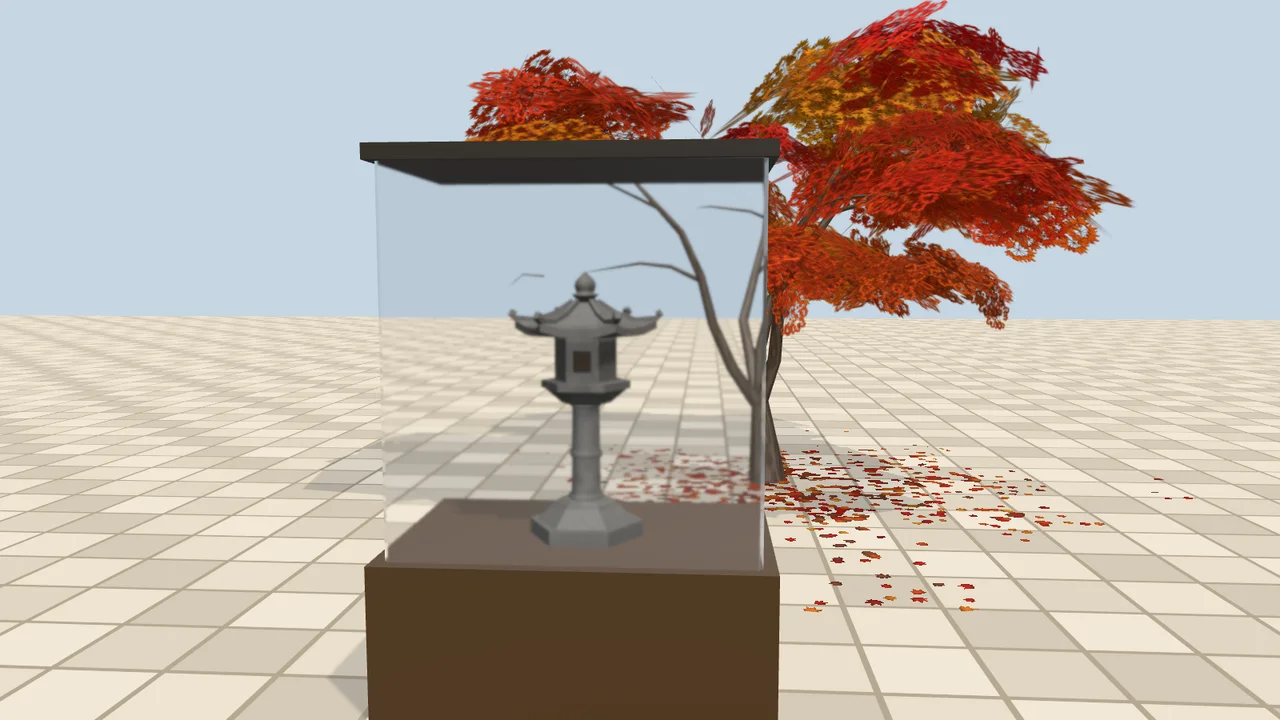
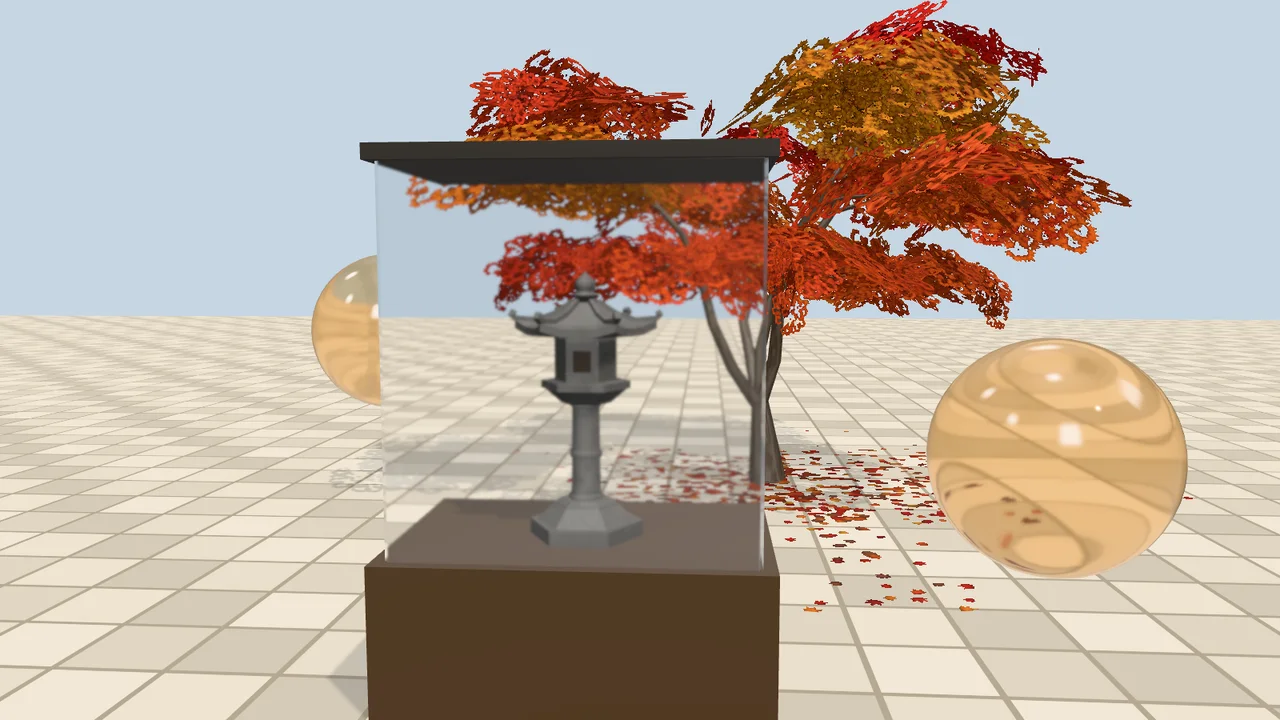
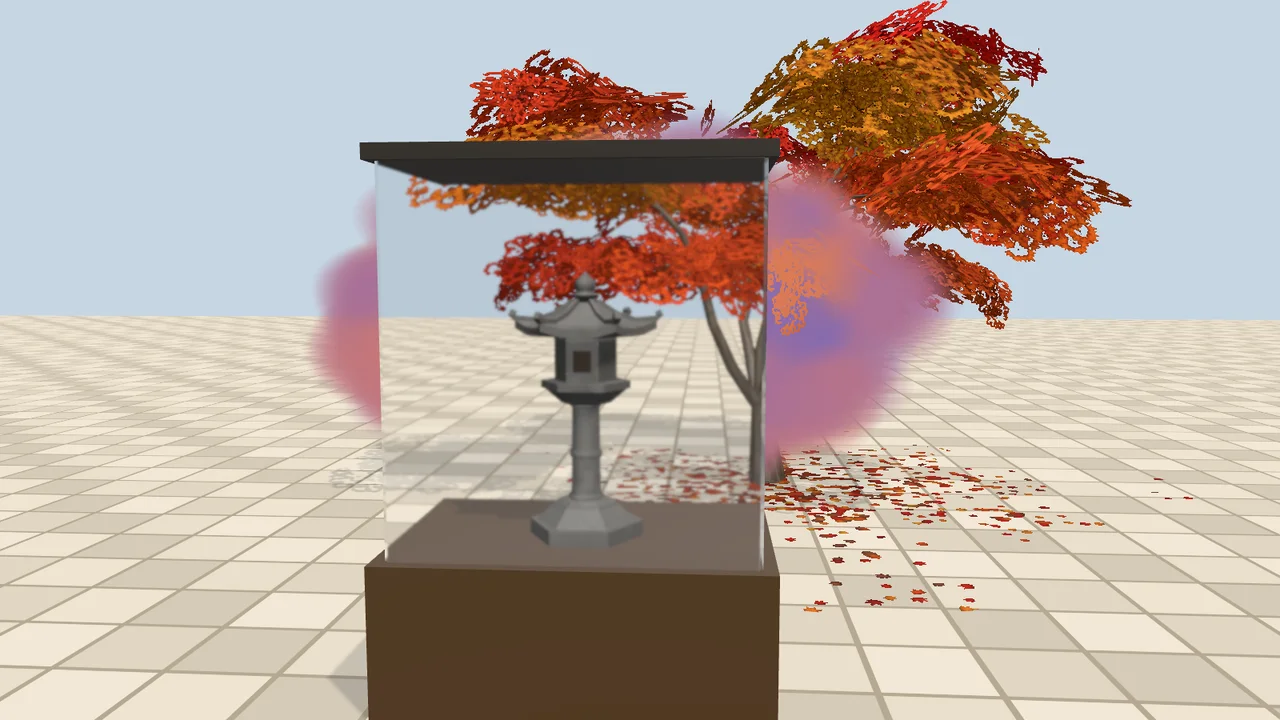
Cut-out foliage (alphaTest or alphaToCoverage) is opaque, so it shows through glass correctly — one more reason to prefer it. For glass behind glass there is no setting; keep the overlap small or accept it. For particles behind windows, either draw them in front of the glass with care or fake the window with opacity glass. Cost, measured below: the extra pass doubled the draw calls of our forest scene.
What each mode costs
Forest of 49 maple trees, cost per frame by foliage mode (lower is better)
- GPU time
- CPU: renderer.render()
EXT_disjoint_timer_query_webgl2 around the whole frame, including the shadow map; it also counts time the GPU waits for the CPU, so in CPU-heavy rows it is an upper bound; CPU time is the JavaScript time of the render() call. “Cards opaque” renders every leaf card as a full rectangle — the geometry cost with no alpha at all. “Single pass” = forceSinglePass: true. NVIDIA GeForce RTX 4060 Laptop GPU, Chrome 156, ANGLE → Direct3D 11, three.js r180, 1600×900.All values, with draw calls
| Foliage mode | GPU | CPU render() | Draw calls |
|---|---|---|---|
| Cards opaque | 1.2 ms | 0.80 ms | 195 |
| alphaTest, no MSAA | 1.6 ms | 0.81 ms | 195 |
| alphaTest, MSAA 4× | 1.8 ms | 1.4 ms | 195 |
| alphaToCoverage, MSAA 4× | 1.8 ms | 1.2 ms | 195 |
| alphaHash, no MSAA | 1.8 ms | 1.3 ms | 195 |
| Blended, depthWrite on | 3.5 ms | 3.8 ms | 291 |
| Blended, depthWrite off | 3.8 ms | 3.6 ms | 291 |
| Blended + alphaTest 0.25 | 3.8 ms | 3.9 ms | 291 |
| Blended, forceSinglePass, depthWrite on | 1.4 ms | 0.94 ms | 195 |
| Blended, forceSinglePass, depthWrite off | 3.1 ms | 1.5 ms | 195 |
Foliage first. In a forest of 49 maples with 4.2 m spacing, seen from inside, the cut-out modes cost 1.6 ms to 1.8 ms of GPU time, and in this test we found no difference between alphaToCoverage and plain alphaTest with MSAA (1.8 ms against 1.8 ms median; differences of a few tenths of a millisecond are within the run-to-run spread we saw). All of them are dearer than the same cards drawn as plain rectangles (1.2 ms): a shader that can discard limits the GPU’s early depth rejection. Blending the leaves with the default settings cost 3.5 ms of GPU time and 3.8 ms of CPU time, against 1.8 ms and 1.4 ms for alphaTest with MSAA — and it looks worse.
Most of that penalty is not blending. The draw calls rose from 195 to 291 because double-sided transparent materials are drawn in two passes, and for each mesh three.js sets material.side, sets material.needsUpdate = true and draws, twice — so the material’s program is looked up again twice per mesh per frame. With forceSinglePass: true the same blended forest took 0.94 ms of CPU and 195 draw calls. The real GPU price of blending shows with depthWrite: false, when nothing behind a leaf is rejected any more: 3.1 ms in a single pass, about 1.7× the cut-out cost. Use forceSinglePass on double-sided transparent cards; keep two passes for closed shapes where it fixes the image.
Full-screen layers drawn on top of each other: GPU time per frame
- Transparent (blended)
- Opaque, drawn far to near
- alphaHash (opacity 0.5)
- Opaque, sorted near to far
MeshStandardMaterial plane at 1600×900 (1.44 million pixels); each frame was rendered 12 times inside one timer query and divided. NVIDIA GeForce RTX 4060 Laptop GPU, Chrome 156, ANGLE → Direct3D 11, three.js r180, 1600×900.All values
| Layers | Transparent | Opaque far→near | alphaHash | Opaque near→far |
|---|---|---|---|---|
| 1 | 0.12 ms | 0.11 ms | 0.16 ms | 0.13 ms |
| 2 | 0.26 ms | 0.25 ms | 0.39 ms | 0.10 ms |
| 4 | 0.56 ms | 0.57 ms | 0.64 ms | 0.10 ms |
| 8 | 1.0 ms | 1.1 ms | 0.77 ms | 0.11 ms |
| 16 | 1.9 ms | 2.0 ms | 0.84 ms | 0.12 ms |
| 32 | 4.5 ms | 4.5 ms | 0.91 ms | 0.13 ms |
| 64 | 9.3 ms | 9.3 ms | 1.0 ms | 0.16 ms |
Overdraw is the GPU cost of transparency. Each full-screen blended layer added about 0.15 ms at 1600×900 in our test, linear in the number of layers. Opaque layers drawn near to far stayed flat: after the first, the depth test rejects every pixel before it is shaded. Opaque layers drawn far to near cost as much as blended ones — that is why three.js sorts the opaque list front to back. alphaHash at 50% coverage levels off after a few layers, because each layer fills about half of the remaining pixels with depth.
Many small meshes: CPU time of renderer.render() per frame
- Opaque
- Transparent
- Transparent, sortObjects = false
All values, with the time spent inside the sort
| Meshes | Opaque render() | of which sort | Transparent render() | of which sort | Transparent, no sort |
|---|---|---|---|---|---|
| 1,000 | 1.0 ms | 0.13 ms | 1.8 ms | 0.20 ms | 0.97 ms |
| 5,000 | 6.7 ms | 0.73 ms | 6.4 ms | 0.69 ms | 5.2 ms |
| 20,000 | 36 ms | 4.8 ms | 34 ms | 4.1 ms | 20 ms |
Sorting is not where the CPU time goes. With 5,000 transparent meshes the comparator ran for 0.69 ms per frame inside a 6.4 ms render call, and the opaque list is sorted too (0.73 ms). The bars track draw calls — about 1.3 µs each here, the same for opaque and transparent. Turning sortObjects off saved 1.2 ms at 5,000 meshes — the sort plus the per-object depth projection it skips — and gives up correct blending, so it is rarely worth it.
| Scene | GPU | CPU render() | Draw calls |
|---|---|---|---|
| Forest, alphaTest leaves | 1.9 ms | 1.2 ms | 195 |
| + one transmission glass pane | 4.8 ms | 5.2 ms | 391 |
+ same pane, transmission | 4.0 ms | 4.4 ms | 391 |
| Crossing planes, sorted | 0.50 ms | 0.19 ms | 7 |
| Crossing planes, weighted blended OIT | 0.48 ms | 0.20 ms | — |
| 5,000 puffs, index-sorted, straight to canvas | 3.2 ms | 0.60 ms | 3 |
| 5,000 puffs, weighted blended OIT | 7.7 ms | 0.28 ms | — |
One small transmission pane made the forest 2.5× as expensive on the GPU and 4.4× on the CPU: the whole opaque scene is drawn twice, whatever the size of the glass on screen. Halving the transmission resolution won back 0.78 ms of the 2.9 ms the pass added on the GPU; the CPU time of the render() call also fell, from 5.2 ms to 4.4 ms, although the second pass still issues the same 391 draw calls. Part of that time is probably the driver waiting on GPU work that shrinks with the target, such as resolving and mipmapping it; we did not isolate it. Keep transmission for hero glass; for a city full of windows, opacity glass with an environment map is the affordable option.
Numbers are from one laptop GPU (NVIDIA GeForce RTX 4060 Laptop GPU, Chrome 156, ANGLE → Direct3D 11, three.js r180, 1600×900) and are best read as ratios. CPU times include driver work that ANGLE does on the calling thread. For the GPU timings each frame of a static scene was rendered 6–12 times in a row to keep clocks stable; a real application frame with animation, data updates and other passes will not behave exactly the same. The bench, with every scene in this article, is a single HTML file; the GLBs are from our Japan pack.
Checklist
Choosing a mode:
- Leaves, grass, fences, chain-link cards: prefer
alphaTest, plusalphaToCoveragewith MSAA. Blend only where soft edges are worth the sorting work (hair and fur often are). - Glass, water, holograms, panels:
transparent: true,depthWrite: false,castShadow = false; split large ones to reduce sorting errors. - Refracting hero glass:
MeshPhysicalMaterialwithtransmission; nothing blended behind it. - Particles and smoke:
depthWrite: false, sort indices per frame; additive only for light. - Fading opaque objects and LOD cross-fades:
alphaHashwith TAA, or keeptransparenton for the whole lifetime instead of toggling it. - Intersecting transparent shapes: split them along the intersection, or accept the approximation of weighted blended OIT.
When something is wrong:
- Log the order:
mesh.onBeforeRender = () => console.log(mesh.name)for one frame. - Object missing behind glass → the glass writes depth. Object in front of glass it is behind → wrong centre;
renderOrderor split. - Wrong only inside one mesh → no triangle sorting; two-pass, index sort or OIT.
- Marker not on top → it is in the opaque list; make it
transparentor use an overlay pass. - Square shadows → add
alphaTest. Blended things missing through glass → transmission renders only opaque objects. - Double-sided transparent cards →
forceSinglePass: true.
Frequently asked questions
Why does setting opacity do nothing in three.js?
Because the material is not marked transparent. With transparent: false the mesh is drawn in the opaque pass and the shader forces alpha to 1. When you create the material, pass transparent: true (and usually depthWrite: false). If it has already been rendered, set material.transparent = true; material.depthWrite = false; material.needsUpdate = true; — in r180 changing transparent does not mark the material as changed, so the old shader variant can stay. For cut-outs use alphaTest or alphaHash.
Does renderOrder work for transparent objects?
Yes, within the transparent list it overrides depth: lower values are drawn first. It cannot move an opaque mesh after transparent ones, because the opaque list is always drawn first; make that mesh transparent too. A THREE.Group’s renderOrder is an extra, higher-priority key for its descendants within each list — not an isolated block.
Should transparent materials have depthWrite false?
For surfaces you look through — glass, water, particles — usually yes, otherwise they hide whatever is drawn after them. Depth writes can help a convex closed shell hide its own back faces, but they do not fix triangle order inside non-convex meshes. To fade an opaque object, alphaHash is often the cleaner choice; for foliage, prefer alphaTest.
What does alphaToCoverage do in three.js?
It converts the fragment’s alpha into an MSAA sample mask. With alphaTest set, three.js smooths alpha over one pixel around the cut-off, so cut-out edges get anti-aliased like triangle edges. It needs a multisampled target: antialias: true on the renderer, or samples on the composer’s render target.
Why are my transparent particles drawn in the wrong order?
They are one mesh (Points or merged quads), and three.js never sorts inside a mesh. Re-sort the index buffer by view depth whenever the camera, the mesh or the particles move (update the world matrices first), switch to additive blending if the effect is light, or use alphaTest if the sprites can be hard-edged.
Why is my glass invisible or showing the wrong things behind it?
Opacity glass with depthWrite on hides objects drawn after it; turn it off. Transmission glass only refracts opaque objects and the background, so blended leaves, particles and other glass behind it are missing.
Sources
- three.js r180 — WebGLRenderLists.js (painterSortStable, reversePainterSortStable, the three lists)
- three.js r180 — WebGLRenderer.js (projectObject depth, two-pass double-sided transparency, transmission pass)
- three.js r180 — WebGLPrograms.js (OPAQUE, alphaToCoverage, alphaHash in the program key)
- three.js r180 — WebGLShadowMap.js (alphaTest and alphaToCoverage in the depth material)
- three.js r180 — alphatest_fragment (alphaToCoverage smoothstep)
- three.js r180 — BatchedMesh.js (per-instance transparent sort)
- three.js docs — Material (transparent, depthWrite, alphaTest, alphaToCoverage, alphaHash, forceSinglePass)
- three.js docs — Object3D.renderOrder
- three.js docs — MeshPhysicalMaterial (transmission, thickness, ior)
- McGuire & Bavoil — Weighted Blended Order-Independent Transparency (JCGT, 2013)
- Wyman & McGuire — Hashed Alpha Testing (2017)
- glTF 2.0 specification — material.alphaMode
- three.js forum — ThreeJS and the transparent problem
- three.js forum — Always display mesh on top of transparent object
- three.js forum — How to make true glass and not a bug?
- three.js forum — How to make the trees in this scene render correctly?